Example 8th Wall Player
8th Wall is a development platform for creating web-based AR content. 8th wall can be deployed on any platform that supports WebAR or WebVR.
The A-Frame: HoloStream 8th Wall (external link) project contains a minimal A-Frame (external link) Three.js scene playing HoloStream content in 8th wall. Refer to the Three.js (external link) and HoloStream API documentation for details on individual functions and components.
Getting Started
This document contains steps to get started and an overview of the A-Frame: HoloStream project. The fastest way to get your HoloStream into 8th wall is by using the A-Frame: HoloStream project template.
Cloning the 8th Wall HoloStream Project template
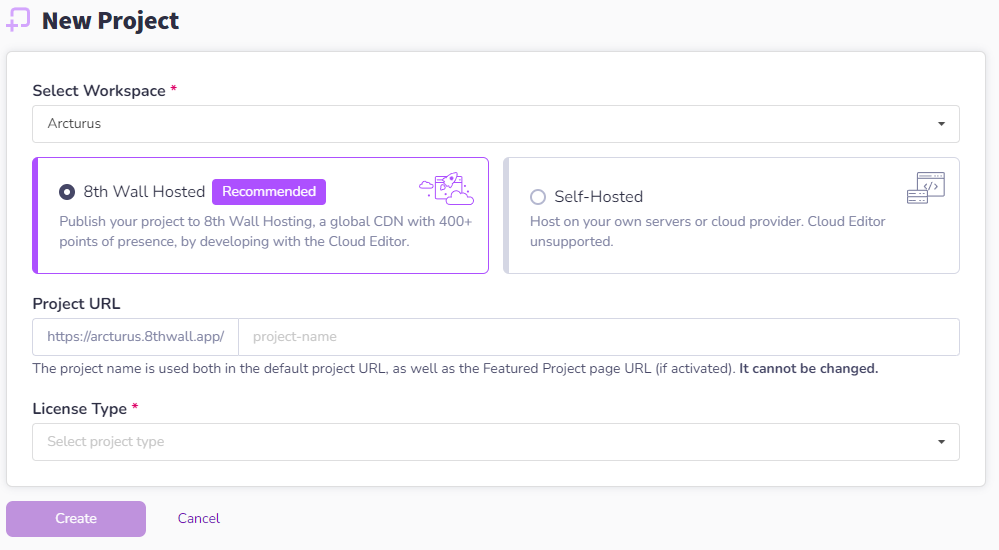
From the my projects page of the 8th Wall site, click the Start a new project button. This will open the new project page. Select your workspace, project URL, and license type according to your needs. For more information, see the Start a New Project section on the 8th Wall Documentation. Once you are finished, click the Create button.
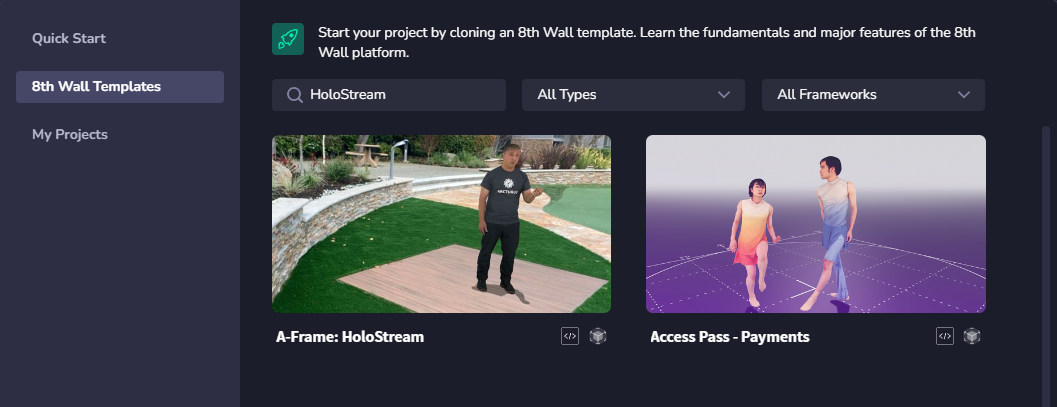
This will bring you to the quick start page. Click on the 8th Wall Templates tab to open the templates selection menu. In the search field, type in HoloStream. Then click on the A-Frame: HoloStream template, and click the Clone Project button on the template details screen. This will create a clone of this template that you can modify to suit your needs.
Acquiring your HoloStream .mpd URL
The next step in setting up your 8th Wall project is to get your HoloStream .mpd URL. If you have one already, you can continue to the next step. If you don’t yet have one, please take a look at the Upload to HoloStream section of the docs for instructions on exporting your HoloEdit project to HoloStream.
Reviewing in the 8th Wall Editor
Now that you have cloned the project, you will be taken to the 8th Wall editor. In the 8th Wall editor, you can review and edit the code of the A-Frame project. The holostream-component.js file contains the code to import the HoloStream using the HoloStream API and manage the A-Frame scene.
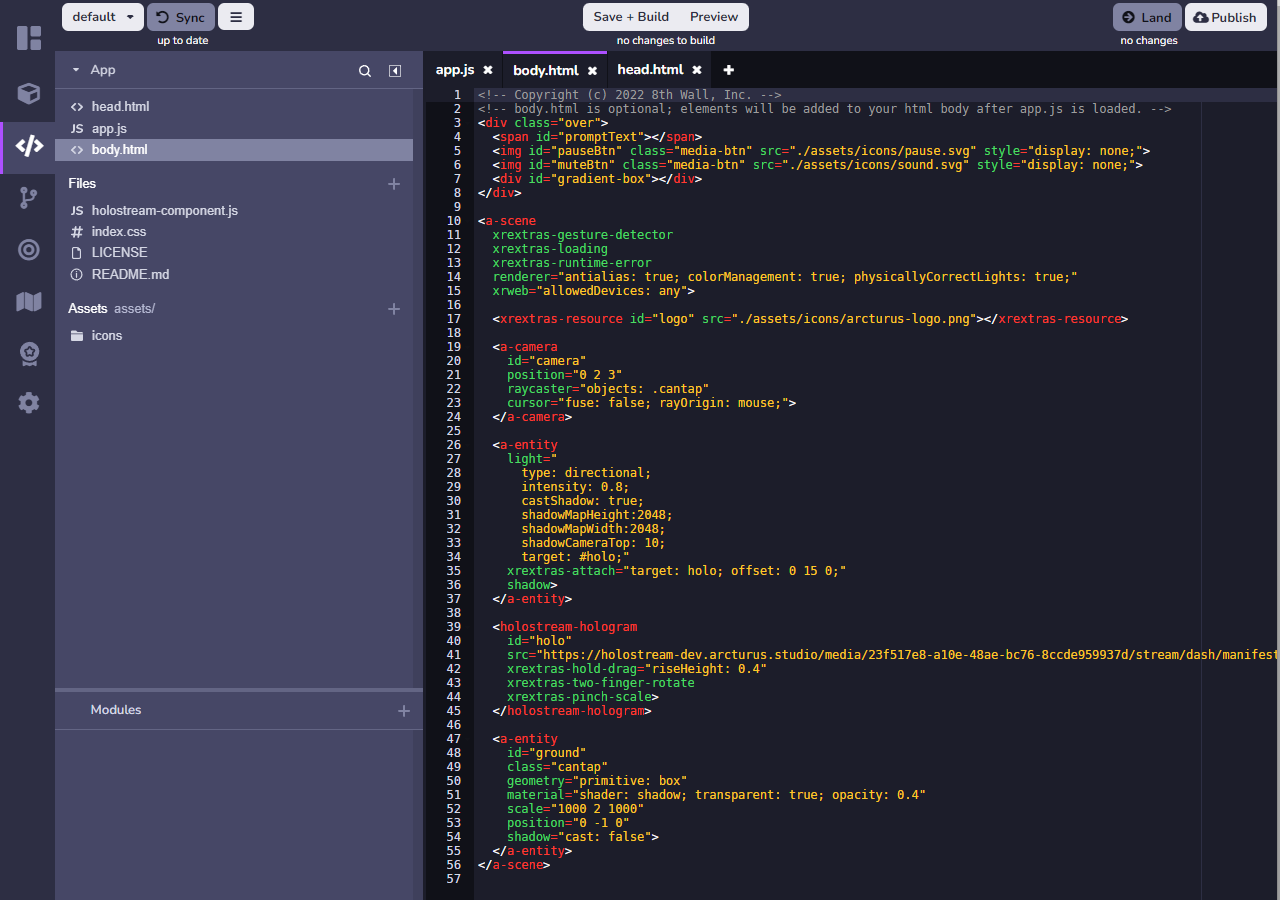
In the head.html file 8th wall tags and external scripts are initialized. The HoloStream API is imported in a <script> tag.
In the body.html file the A-Frame scene is configured, along with a camera and several a-frame entities. The HoloStream player is added to the A-Frame scene with the id “holo”, and the .mpd URL to the HoloStream Clip.
To change the HoloStream clip, replace the default URL (“https://holostream-dev.arcturus.studio/media/23f517e8-a10e-48ae-bc76-8ccde959937d/stream/dash/manifest.mpd”) With the URL for your HoloStream clip.

Important
Be sure to use the URL ending in .mpd, and not a HoloStream preview URL ending in the GUID for a HoloStream clip.
Previewing your Project
To preview your 8th wall project, click Save + Build to build the project. Once it is built you can click Preview at the top of the screen. This will give you a QR code that you can scan to open a preview of your project on a phone or tablet.
Note
You can select debug mode here if you are looking for more information on the performance of your 8th wall project.
After launching the 8th wall project on your mobile device, you’ll be ready to preview your HoloStream clip. Because of the code in the holostream-component.js file, you will need to tap the screen to select a flat surface in order to place the HoloStream clip.
You should now see your HoloStream clip displayed. You can pinch to scale the HoloStream clip, touch and drag to reposition it, and rotate it by dragging with two fingers.
Landing
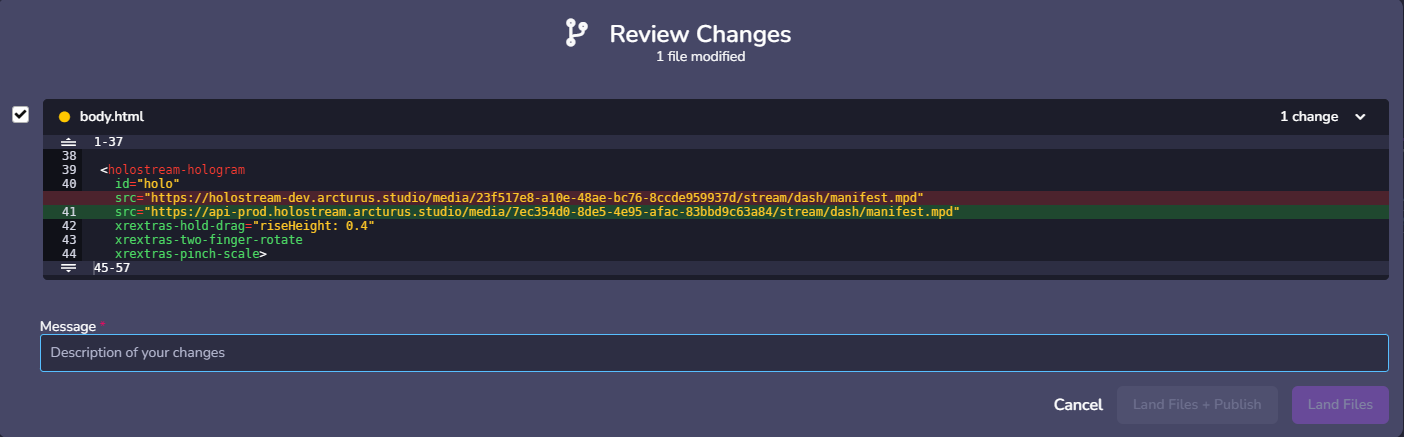
If your HoloStream looks good when you preview it, then you are ready to land your 8th Wall project. The 8th Wall editor uses a source control-like method for managing changes. This lets you land changes to your code in the same way you would commit when using source control. To do this, click the Land button in the top right of the editor. This will prompt you to leave a commit message before you are able to click the Land Files button at the bottom right.
Publishing
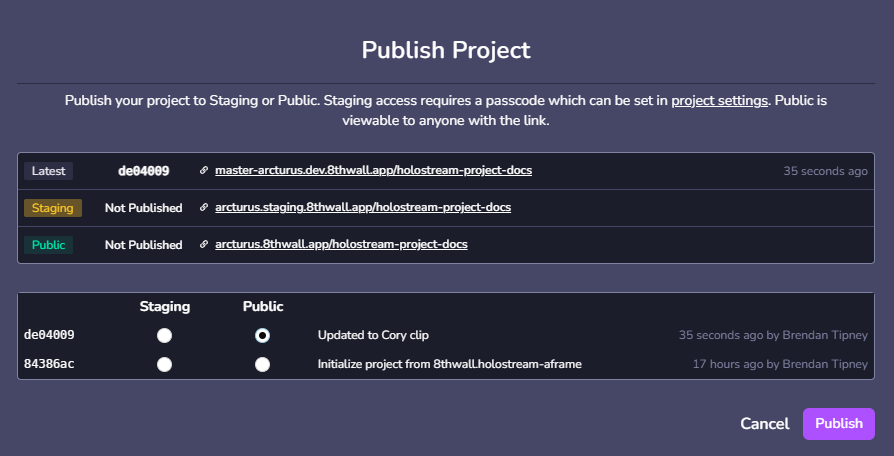
Now that your changes are landed, you are ready to publish. To do this click the Publish button in the top right corner of the editor. This will open the publish screen. Here you can select the commit and privacy for your published project. Staging will allow you to publish with a password, allowing it to be shared, but not accessed by the public. Select your most recent commit and desired privacy setting before clicking the Publish button. Lastly you will be prompted to configure the details for the project. Fill in the project title, cover image (optional), and details (optional) before clicking the Done! button. You will then be presented with a direct link that can be used to access the published project.
Controlling the 8th wall project
In body.html, an A-frame scene and multiple entities are declared. The logic for the holostream-entity object is contained in HoloStream-Component.js. A HoloStream instance is configured correctly and created, and the HoloStream mesh is drawn in the 8th wall scene. The rest of the component’s logic is general 8th wall and A-Frame functionality.
Initializing a HoloStream Instance
    const holoStreamOptions = {
      debugEnabled: false,
      targetCanvasID: '',
      threeScene: this.el.sceneEl.object3D,
      threeCamera: cameraElement.object3D,
      threeRenderer: this.el.sceneEl.renderer,
      hideUI: true,
      overrideRender: true,
      showPlayButtonOnLoadingScreen: false,
    }

    this.holoStream = new HoloStream(holoStreamOptions)
    this.holoStream.openURL(this.data.url)
The HoloStream player is configured by supplying the existing A-Frame SceneEL, cameraElement, and renderers as parameters to the Options object in the HoloStream Constructor. Then, the holostream mpd url supplied as src in the body.html file is opened.
Drawing the HoloStream Mesh
in the placeHoloGram event, the holoStream.getThreeMesh() function is used to assign the streaming mesh to the element with this.el.object3D.add(mesh). The mesh is placed according to the touch event, and is set to play back with this.holoStream.handlePlay(true).
Image Tracking
We provide another 8th wall template scene that allows you to create an image-tracked Volumetric clip. In our template a trading card is being used for tracking by default, but this could be changed to be a business card, poster, packaging or any other trackable image.
You can check out this template in action here.
Cloning the template
You can use the Image Tracking Template to clone the project.
HoloStream link
As before you will want to change the streaming .mpd link in the body.html file. This time the HoloStream-hologram can be found as a child of the xrextras-named-image-target object. This lets the volumetric clip transform in relation to the position, rotation, and scale of the tracked image. Change the .mpd URL after the src= line to match your .mpd.
Transform
You can then adjust the position and rotation of your clip in relation to the tracked image using the rotation and position attributes below the src attribute. You can also add in a scale attribute if you need to adjust the scale of the volumetric clip.
Image Target
To test out this project, you can simply use the image on the image targets screen to trigger the tracking. To use your own image as an image target, simply upload a new image target in the image target screen. This screen can be found in the tabs to the left, and has a target icon. If your new tracked image has a different name, you will need to change the name attribute of the xrextras-named-image-target to match the name of the new image target you have uploaded.
Note
Autoplay: Due to Apple’s autoplay restriction, in order to have the clip play when the target image is found, the audio must start muted. If your clip has audio, ensure this.hasAudio of the holostream-component is set to true. This will cause a tap to unmute prompt to show at the bottom.
Components
<holostream-hologram> Is the HoloStream clip.
src: This must be updated to the mpd URL for your HoloStream.
<xrextras-named-image-target> represent the tracked image once it is located.
Because the holostream-hologram component is a child of the xrextras-named-image-target, it will copy its positional data, moving it with the card once tracked.
name: This is the name of the image target as it appears on the “Image Targets” page
Learn more about Image Targets here: documentation.
Further Learning
This is the basics of using HoloStream clip with 8th wall. For more information, reference the HoloStream API documentation, along with the 8th Wall, A-Frame, and THREE.js documentation.