Creating Clips
Any directory in your Workspace that contains supported mesh or texture files can be used to create a clip at any time by pressing the Make Clip button in the Project panel. Clips can contain mesh data, texture data, animation data, audio data, and data having to do with segments and compression.
HoloEdit indexes all supported files as they’re added to the workspace, and if any suitable files are located within a non-clip directory (or any nested directories inside) the Make clip button will be available for that folder.
Some data types can be made into clips as individual files, rather than as contents as a folder. Mp4, OMS, and audio files will display the ‘make clip’ button as individual files. Some of these formats can still be imported in folders as part of a larger clip.
For Clips with subfolders, every sample is evaluated equally, regardless of folder structure. So for example, a folder with per-frame textures located in the directory root, and meshes located in individual subdirectories for each mesh, would produce the same Clip as a folder with the same files in root.
Warning
A Clip cannot contain another Clip. As soon as you create a Clip, you can no longer create a new Clip from any of that clip’s parent directories.
When a Clip is created, the samples that make up the Clip are associated with the timing of the Clip, so that frames play in order, gaps are preserved, and so on. By default, this happens automatically based on frame numbers detected in the input filenames. Alternatively, you can specify specific patterns via the Import Pattern Settings. See Import Pattern Settings for details on alternate import behaviors.
Note
It’s not recommended to create a Clip out of a complex tree of directories. If multiple files with the exact same filenames are present in a Clip, only the last file imported by HoloEdit will be used.
The Import Clip Window
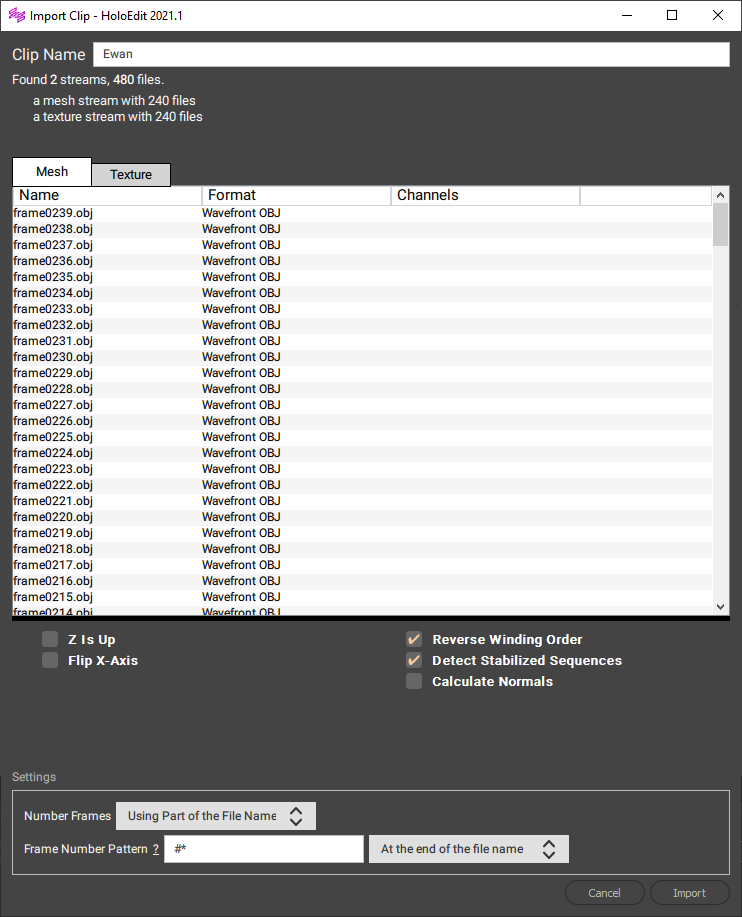
Clip settings are configured via the Import Clip window.
You can open the Import Clip window by pressing the “Make Clip” next to a folder in the project panel, or right clicking on an existing Clip and choosing “Reimport Clip”, or by pressing the “Reimport” button if files have been added or removed to the Clip folder.
The Import Clip window is used to specify Clip parameters before creation, or change those settings for re-import. The Import Clip window is made up of several parts:
The “Clip Name” Field
This field previews the name of the Clip. By default, it will be the same as the name of the directory in your workspace. To rename the clip, enter a name of your choosing before importing the clip. The folder in your workspace and clip inside of HoloEdit will both be updated to reflect the new name.
The “Clip Information”
This text directly below the Clip name. This has details on the streams and files selected for the clip.
The “Stream Inspector”
This large field has one or more tabs of list views. One tab is present for each stream, and details on the contents of the stream.
If Mesh Data is present, the Mesh Stream settings will be displayed directly below the Stream Inspector. See “Mesh Stream Settings” below for more detail on configuring the import settings.
At the bottom of the window, the Import Pattern Settings determine how files correspond to frames in the Clip. By default, HoloEdit will sort frames by alphabetical order. See “Import Pattern Settings” below for more detail on configuring import patterns.
Updating Clips
When HoloEdit detects new supported files are added to an existing Clip directory, an “Update” button will appear to the right of the Clip. Pressing this button is the same as choosing Reimport from the right click menu.
Data Streams
Clips are made up of “Data Streams”, sequences of data that make up Volumetric Video. Streams come in several types, and contain various kinds of data used by HoloEdit in Stages and Export. The two main types of Data Streams in HoloEdit are Mesh streams, which represent 3D geometry and related data such as skinning and colors, and Texture streams, which represent surface textures or Multi View Environments.
Note
There are also streams for Skeletal Animations, called Animtion Streams, streams for segment data, and so on for other data you might find in a HoloEdit Composition.
Mesh Stream Settings
When configuring a Clip containing Mesh Streams, the following options are available.
Z is Up: Toggle the orientation of the Clip to use “Z up” rather than “Y up” coordinates. This is necessary for Clips exported from certain 3D packages and capture technologies
Flip X-Axis: Toggle the orientation of the X Axis. This is necessary for Clips exported from certain 3D packages and capture technologies
Reverse Winding Order: Reverse the winding order of the mesh samples, turning the mesh “Inside out”. Use this setting if your Clip appears to have flipped geometry, allowing you to see textures on the inside of the mesh. This is necessary for Clips exported from certain 3D packages and capture technologies
Detect Stabilized Sequences: This option detects existing Stabilization (sometimes called Registration, or Filtering) present in the mesh stream. Enable this If your mesh stream was exported from HoloEdit after processing in a Stabilize Stage, or comes from another source with Stabilization added
Calculate Normals: This option automatically calculates surface normals for shading your mesh. If your mesh streams come with existing normals pre-defined, leave this off. Note that normals slightly increase the file size of your output Clip. With a Clip selected, this option also appears in the Clip Inspector
Bake Transform: This option is only present if your clip contains Alembic (.abc) files. When enabled, the alembic file’s world transform is sampled and applied to the mesh each frame
Import Pattern Settings
The Import Pattern settings specify the order and timing for the data in your Clip.
The default settings sort the imported frames by number, and should be appropriate for most Clips. The following controls are provided if special import rules are necessary:
Number Frames
The Number Frames dropdown controls whether file names should be interpreted using part of the filename, or sorted by name. When sorted by name, files are ordered in what is often referred to as a “natural” order, which is alphabetically except for strings of digits, which are compared using their numerical value so that e.g. “101” comes after “11” even though “0” comes before “1.” Each file type is sorted separately. By default, this is set to “Using Part of the File name”, with a default Frame Number Pattern to consider only numbers.
Frame Number Pattern
When Number Frames is set to “Using Part of the File Name”, you can specify a pattern using the Frame Number Pattern field. The pattern text is matched exactly, except for a few special wildcard characters:
# : matches the frame number or frame range (see below)
* : matches zero or more non-digit characters, including spaces
- : matches one or more digits, but excludes them from the pattern
The “#” character matches either a string of digits, or two strings of digits separated by one “-“ and any amount of spaces. For example, “2”, “018”, “1-10”, or “0008 - 0012”. The result is used as the frame number (or frame range, if it’s a range). The pattern must include exactly one # wildcard.
The wildcard characters can be escaped (treated as a non-wildcard character) by adding a backslash (\) before them.
Additionally, using the dropdown to the right of the Frame Number Pattern you can set whether the pattern occurs at the start or end of the filename, anywhere in the filename, or must match the whole filename.
Frame Number Pattern Examples:
Sort by the last number in the filename:
#*, at end of filename. This captures filenames like “myframe_100” or “myframe100” (default)Sort by the second number in the filename:
-*#, at start of filename. This captures filenames like “take_1_myframe100” or “take_1_myframe_100_scene_2”Sort by the number that appears after “frame”:
frame#, anywhere in filename. This captures filenames like “02_04_2021_frame100” or “take_2_clip_6_frame100_02_04_2021” but excludes filenames like “frame_50”Sort by the number that appears after the “#” character:
\##, anywhere in the filename. The escaped # at the start captures filenames like “frame#100” or “02_04_2021_#100”
Note
A summary of this information can be seen by hovering over the “?” icon next to the Frame Number Pattern box.
Import Scaling Factor
Import Scaling Factor will allow you to resize your mesh at import. A number of HoloEdit processing parameters are scale dependent and expect real world scale at default settings. Use this feature to apply scale to your mesh, where the default setting of ‘1’ uses the current scale. Decrease this value to reduce the size of your mesh, increase it to scale your mesh up. The most common scale issues come from unit conversion between different applications, so scaling by factors of 10 (0.01, 0.001, etc) will be your most productive action.
Import File Types
HoloEdit supports industry standard formats for Clip import. Each format will be converted into appropriate Data Streams inside of HoloEdit based on the file type and it’s contents. See the Import Formats section for per format details.
Adding Clips to the Composition
Clips are added into HoloEdit Compositions using the Load Asset Stage. For more information on Stages, see Composition Contents to learn about compositions.