Retargeting Presets
A number of workflows are enhanced by generating skeleton and skin weight information. If you are looking to generate clip with head retargeting, object tracking or reanimation start by using the retargeting presets. These presets are designed for an OMS workflow, as retargeting is not currently supported for AVV.
To generate an AVV with a skeleton:
Follow the retargeting preset that suits your data
Remove the ‘Generate Head Skin Weights’ stage
Add and process:
Detect Face
Analyze Texture (AVV)
Transfer Normals (for unstabilized data)
Generate Motion Vectors (for projects targeting Unreal Engine)
Currently this workflow is only supported for clips with a single performer. Props and costumes that occlude the performers form can lead to poor skeleton results.
Default retargeting presets are tuned for a low to medium level of action in the performance, and a mesh density from 35,000-90,000, and certain stage presets may need to be adjusted for Clean and Stabilize Mesh stages if your source data falls outside of this range.
Head Retarget
Select this preset when generating an OMS with head retargeting for unstabilized data.
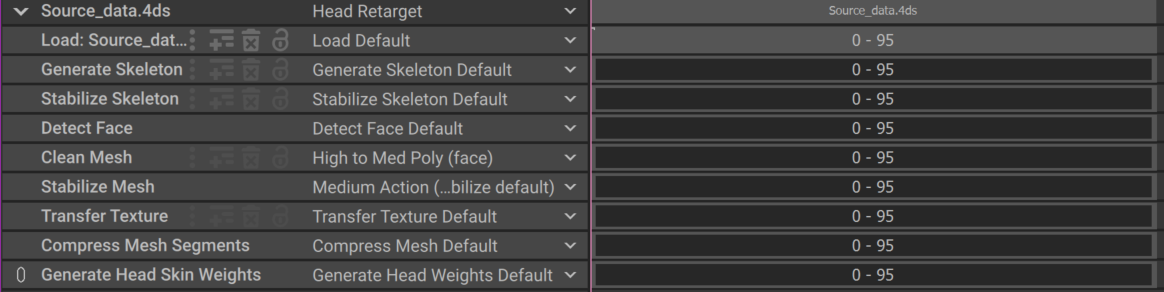
Default Stages
Load Asset |
Load Asset stage contains source data used when creating your composition. |
Generate Skeleton - Generate Skeleton Default |
Requires textured mesh. Generates an MVE that is used to create a skeleton per-frame based on your clip’s contents. |
Stabilize Skeleton |
As the skeleton generated using Generate skeleton creates per-frame results there can be jitter and small inconsistencies frame to frame. Stabilize Skeleton will help to average the skeleton over a range of frames. |
Detect Face - Default |
Generate metadata establishing areas of the mesh recognized as a human face. This data is used to prioritize retention of performer’s face details during the Optimize Texture and Clean Mesh stage of this preset. |
Clean Mesh - High to Med Poly (FaceAware) |
The Clean Mesh stage will ensure there are no mesh defects that could negatively affect future processing. It will decimate the mesh to 30,000 vertices and preserves the mesh details around the performer’s face. When working from a very high level of mesh density it may be necessary to disable “Preserve UVs’ and apply a Generate UVs stage following Stabilize Mesh. |
Stabilize Mesh - Medium Action |
Medium action Stabilize Mesh should work in many cases. Higher action performances may need to be processed using the ‘High Action’ stage preset. If you are uncertain of the processing requirements for your specific data we advise testing on smaller selection of frames first to verify that the default parameters will be successful. |
Transfer Texture - Default |
The Transfer Texture’s ‘Texture Source Stage’ parameter will default to the lowest Load Asset in your composition. This should capture the correct mesh and texture source data in most cases. |
Compress Mesh Segments - Compress Mesh Default |
Compress Mesh Segments can be run for the whole composition without any adjustments. |
Generate Head Skin Weights - Generate Head Weights Default |
Default settings will work in many cases, when dealing with a high collar or complex hair it may be necessary to adjust this stages default settings. |
Head Retarget (pre-stabilized)
Select this preset when generating an OMS with head retargeting for pre-stabilized data.

Default Stages
Load Asset |
Load Asset stage contains source data used when creating your composition. |
Generate Skeleton - Generate Skeleton Default |
Requires textured mesh. Generates an MVE that is used to create a skeleton per-frame based on your clip’s contents. |
Stabilize Skeleton |
As the skeleton generated using Generate Skeleton creates per-frame results there can be jitter and small inconsistencies frame to frame. Stabilize Skeleton will help to average the skeleton over a range of frames. |
Detect Face - Default |
Generate metadata establishing areas of the mesh recognized as a human face. This data is used to prioritize retention of performer’s face details during the Optimize Texture and Clean Mesh stage of this preset. |
Clean Mesh - High to Med Poly (FaceAware) |
The Clean Mesh stage will ensure there are no mesh defects that could negatively affect future processing. It will decimate the mesh to 30,000 vertices and preserves the mesh details around the performer’s face. When working from a very high level of mesh density it may be necessary to disable “Preserve UVs’ and apply a Generate UVs stage following Stabilize Mesh. |
Compress Mesh Segments - Compress Mesh Default |
Compress Mesh Segments can be run for the whole composition without any adjustments. |
Generate Head Skin Weights - Generate Head Weights Default |
Default settings will work in many cases, when dealing with a high collar or complex hair it may be necessary to adjust this stages default settings. |