Processing Sparse Camera Clips with HoloEdit
This guide covers the basic steps required to process volumetric data from a sparse camera system.
Overview
Working with volumetric data captured using a small number of cameras will require a different workflow than data provided by dedicated capture stages. HoloEdit includes tools to facilitate this workflow and help improve your captures overall quality, although final quality is still largely determined by capture quality.
Reducing Your Data Size
Start by creating a workspace and adding your mesh and texture data to a sub-folder.
Import your data into HoloEdit. No import settings need to be adjusted. There are two main considerations for reducing your data size: mesh density and texture resolution. If you find your data is too large to process all at once you can prepare it in chunks ahead of time before completing the main compression steps.
There are two methods to reduce the texture resolution:
Texture Reduction Only
This approach is more lossy but requires no additional job processing. This approach is good for cases where the data will not be seen from close up angles or on larger displays:
Start by importing your data into your workspace
Add your data to a new composition
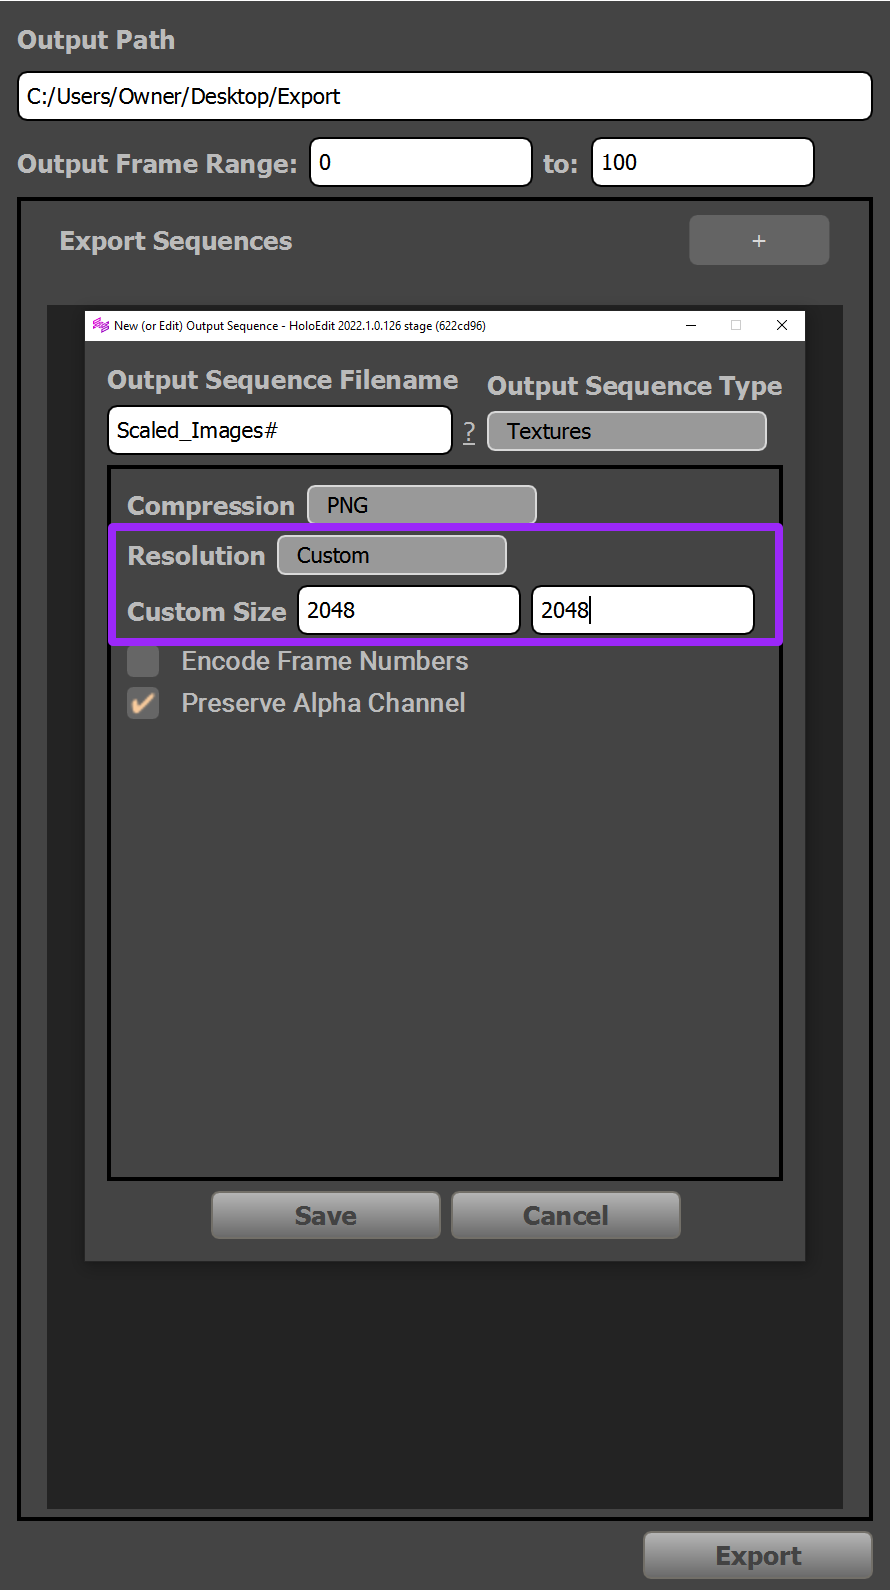
From the File menu select Export Composition
Add a new export step and select Textures as the Output Sequence Type
In the custom size field enter a smaller resolution like 2048 x 2048
After export, you’ll need to import the new textures into HoloEdit. They will be used for processing your clip instead of the original textures (you can do this by adding the new textures clip to a composition after adding your original clip).
Texture and Mesh Reduction
This approach preserves more texture detail, but will increase your overall processing time.
Start by importing your data into your workspace, and your data to a composition
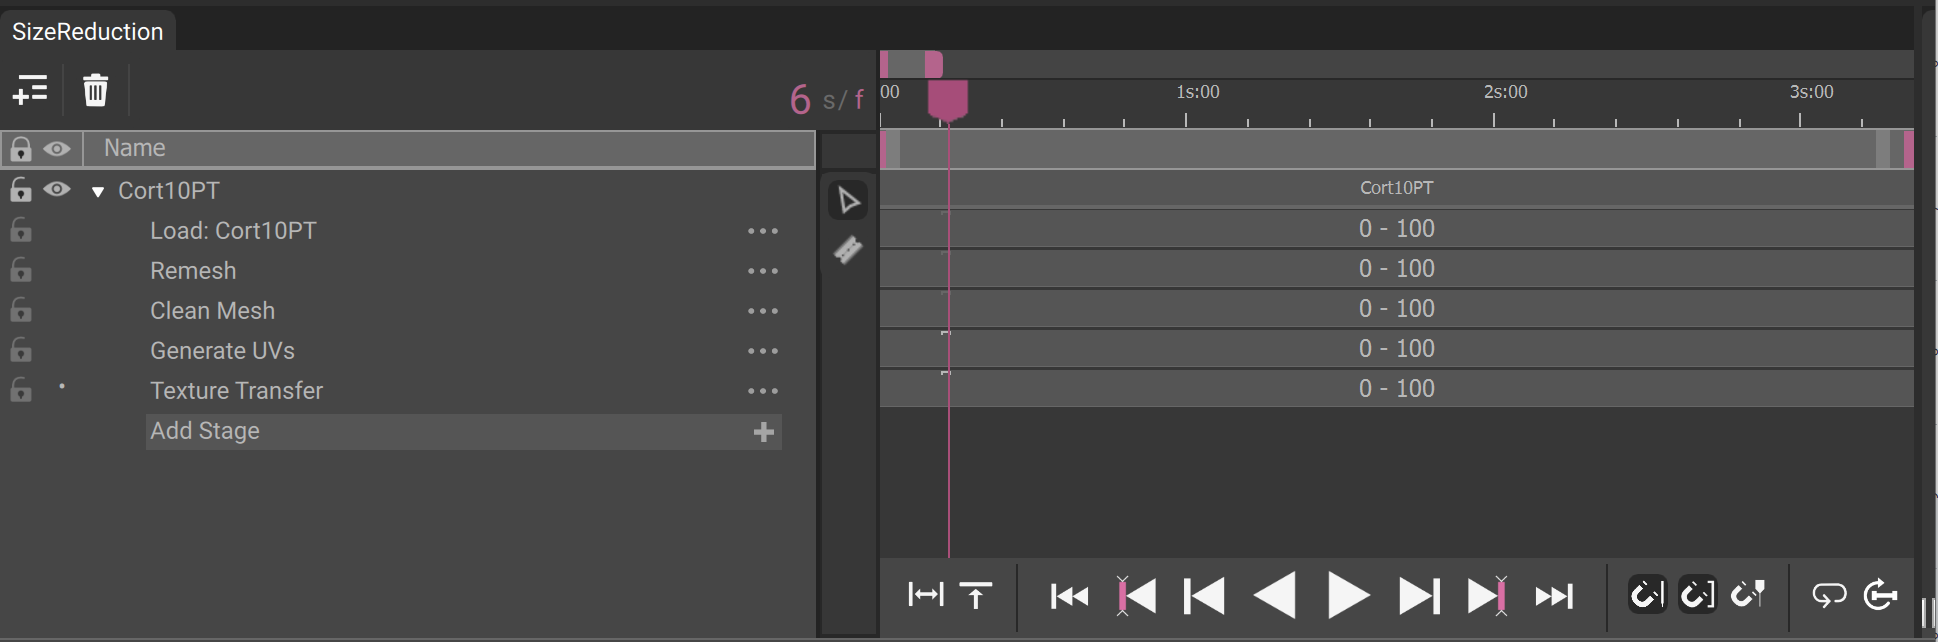
Add a Remesh stage and interval.
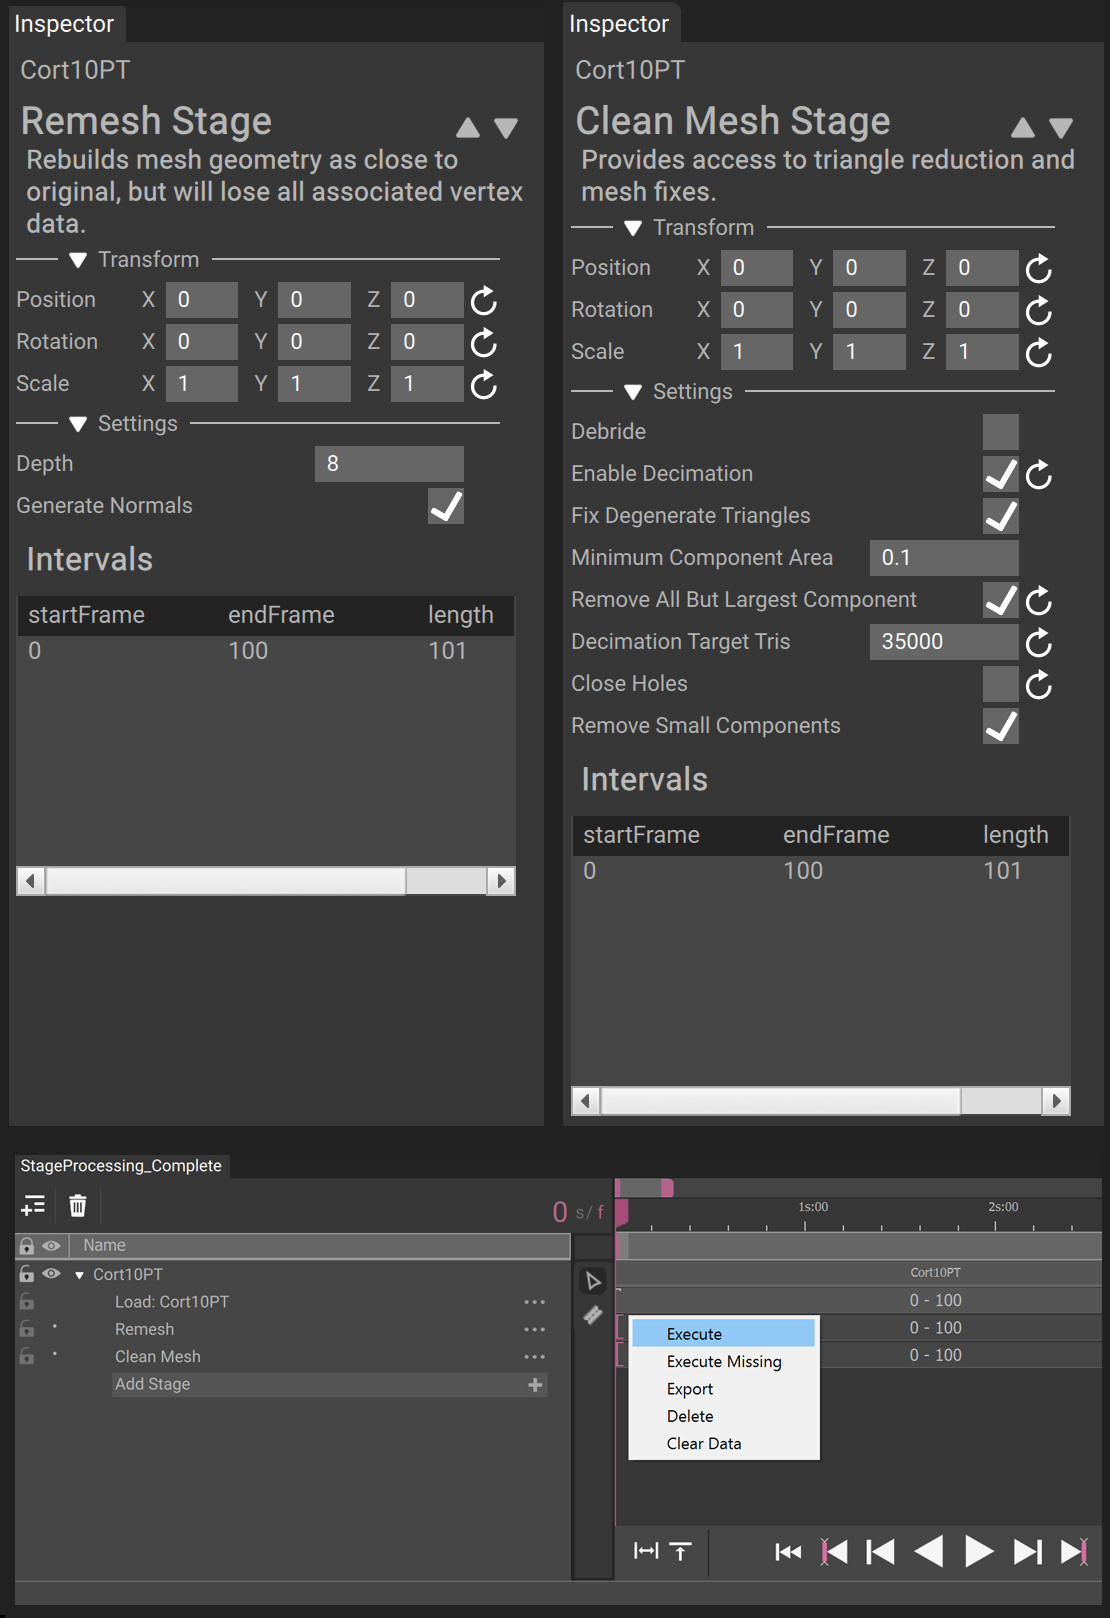
When using Remesh to deal with major mesh issues and/or small floating mesh set the Depth paramater to 7. You will lose some of the details in your mesh but this will work to clean up major mesh issues.
When using Remesh to remove minor mesh errors, leave the parameters set to the stage default of 8.
When using Remesh while trying to preserve original mesh details set the depth to 9
Note
Please be aware that processing Remesh at a depth higher than default will increase processing time and should be used while processing both the Remesh and Clean Mesh stage with decimation enabled, and that the stages should be uploaded as one job to save long wait times for uploads.
Add a Clean Mesh stage and interval. Adjust these parameters:
Enable Decimation: Enabled
Target Vertices: Between 30,000-60,000 depending on the surface complexity of the mesh
Add a Generate UV stage and interval.
Leave the parameters set to the stage defaults.
Add a Transfer Texture stage and interval.
Set the Texture Source Stage to the track’s load asset.
Use the Closest Point Transfer Texture Method.
Select and execute your intervals. Once processing is complete, select Export Composition from the file menu.
Add two new export steps:
Select Meshes
Set an appropriate filename (be sure to leave the # at the end). Use the default OBJ format.
Select Textures
Set a filename matching your meshes. Under the resolution drop down select Custom, then in the custom size field enter a smaller value like 2048 x 2048.
You may still see a bit of loss of quality using this method, but the tighter packed UVs should help to retain a higher level of quality.
After export, you can create a new workspace for the reduced assets. The optimized data will have a smaller storage footprint and allow for faster processing.
Processing Your Data
First bring the data into HoloEdit to begin editing.
Start by adding your data to your HoloEdit workspace
Import the folder containing your sparse camera capture data
Drag the clip into a new composition
Note
To save compute hours and processing time review the clip and find a 10-30 frame sequence that represents the average action and surface quality of the clip. For initial processing focus on those frames to get results back faster and determine the parameters that work for your clip.
Mesh Clean Up
The first task when processing volumetric data from smaller capture setups is cleaning out any noise introduced around the mesh, as well as any surface issues.
For severe mesh issues start by adding a Clean Mesh stage. The parameters enabled will be dependant on the state of your clip:
Debride: This parameter should be enabled when you have long strips of geometry and rough edges around open portions of the mesh.
Remove all but Largest Component: When enabled, this parameter will remove floating and disconnected mesh from the main portion of the capture. The largest volume of connected mesh is preserved while removing other disconnected meshes.
Close Holes: Will seal any holes in the mesh.
Note
If you have already completed the steps detailed in Reducing your Depthkit data size and you are happy with your mesh results, you can skip the remesh and clean stage of these instructions.
Add a Remesh stage to the composition.
The parameters for Remesh can usually be left at default.
Note
If you have a capture with a lot of specific surface details you need to preserve you can increase the Depth (try 9 or 10). This will require more processing time than lower depth values and it is strongly recommended that you also process a Clean Mesh stage with Decimation enabled following it.
If you have a capture with a lot of noise and surface errors you may want to run at a lower Depth. This could also reduce mesh details you are hoping to preserve so consider your projects priorities when working with lower than default Depth values.

Next, add a Clean Mesh stage.
The parameter requirements of this stage will depend on the quality of the clip. In most cases you will want to ensure that:
Enable Decimation: Is enabled - This will help reduce the vertex count of the mesh to decrease processing time and achieve more performant playback.
Fix Degenerate Triangles: Is enabled - Fix Degenerate Triangles is one of the core functions of the Clean Mesh stage and will help prevent errors in processing caused by zero area and malformed triangles.
Target Vertices: Is set to a reasonable value - We suggest between 30,000 and 60,000 depending on the complexity of your clip.
Remove Small components: Is enabled - This will add a final level of clean up for any floating mesh noise left after the Remesh stage. The Minimum Component Area will determine the area of removed components. 0.1 meters is the default threshold and can be adjusted as needed.
Create an interval in the Remesh and Clean Mesh stages for the frame range you chose as a good representation of the clip’s overall quality. Select the intervals and select Execute.
Sending multiple stages at once can drastically speed up processing. When one stage is finished it will pass that data to the next stage in the cloud, sparing you from needing to upload and download that data multiple times.
If you are still seeing floating or messy mesh results adjust the parameters for your Remesh and Clean Mesh stages.
Following mesh clean up is stabilization, the first step to compressing your clip.
Compressing Your Clip
Add a Stabilize Mesh stage.
The two parameters most likely to affect your stabilization results that you should be aware of are:
Segment Max Error: This determines how much error is acceptable between the source mesh and result mesh of stabilization before it creates a break between segments and begins deformation with a different keyframe. If you are finding consistenty bad results from the Stabilize Mesh stage you can decrease this value, but keep in mind that smaller segments reduce compression. Start with the default value. If you find you are seeing long segments with bad deformation results then try decreasing the value. Start with 0.05 and decrease further as necessary.
Sample Radius Factor: Having a higher value here will speed up processing and catch larger movements consistently. If there are a lot of important surface details in your capture you may want to keep the parameters set to the default values. While there is no cap on this value, it is unlikely you would ever exceed 20 when following the guidelines we’ve outlined in this documentation.
Stabilization is one of the stages most affected by source geometry and performance. If you find that the default settings do not give satisfactory results, please review the linked documentation for more in depth insight on the Stabilize Mesh stage and Deformation algorithm.
Following the Stabilize Mesh stage, add a Generate UV stage.
The default parameters can be used.
Next add a Transfer Texture stage.
Drag your “Load” texture stage to the “Texture Source Stage” field and ensure that the Transfer Texture Method is set to Closest Point.
Create an interval for your test frames for these three stages, select the new intervals and then select Execute.
Review the results once the job completes. For any unsatisfactory results adjust your Stabilize Mesh parameters until you find what works for your data set.
Once you’ve successfully found settings that work for your clip add the final stage: Compress Mesh Segments.
The default parameters can be used.
Create new intervals for the rest of the data.

If you are working on a long clip and plan to continue to actively work in the composition while processing your data, you may want to execute jobs in smaller groups where your intervals are only 300 to 900 frames long.
Select the unprocessed intervals and execute the intervals. This will take some time to upload and complete all of the included work.
Once the processing is complete you should review your data carefully. While the earlier testing should have given you good overall working parameters, it is possible that there are areas of the clip that require tweaking. For any areas where the results are not satisfactory, use the razor tool to isolate the frames, adjust the required parameters and execute the new interval (as well as subsequent stage intervals affected by the changes).