Unity: OMS Player Configuration Example
Note
This is a step by step guide to setting up an OMS Player in Unity. The OMS Player Plugin is being replaced by the HoloSuite Player Unity package and support for this plugin will officially end with this version of HoloEdit. It is strongly recommended that you use the HoloSuite Player Unity package going forward.
For the reference documentation for the Unity OMS Player Plugin, refer to the Unity OMS Player Reference Documentation document.
OMS Player Configuration example
The following is a walkthrough of a typical OMS Player configuration:
OMS and MP4 data for use in the OMS player must be located inside of the StreamingAssets directory, in the root or a subfolder of your choosing. All OMS and MP4 files used for playback must be located in the StreamingAssets folder.
Player Configuration is provided by the ‘OMS Player’ script. To use an OMS player, add the script to a new GameObject in your scene.
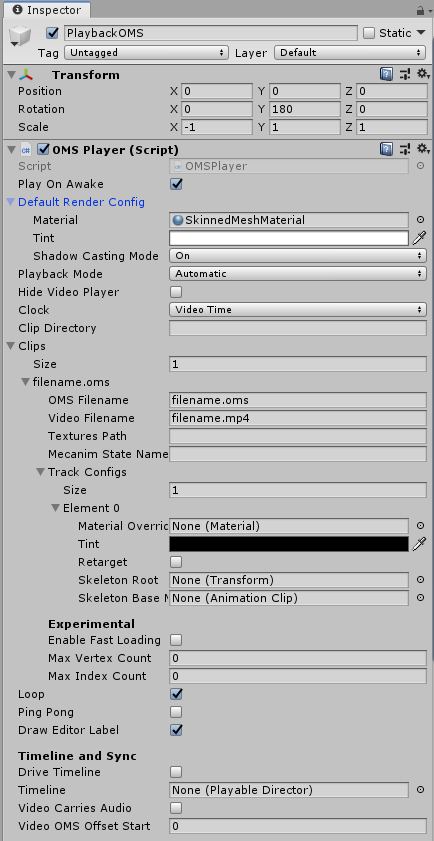
Several fields will need to be updated in the OMS Player component:
Under Default Render Config, ensure the Material is set to SkinnedMeshMaterial (or another material created for rendering OMS files.) and that Playback Mode is set to Automatic.
In the Clips drop down, set the Size to 1 or more, which exposes fields for your OMS and MP4 file locations. Most .oms files will contain one clip, but Multitrack OMS exports (see MultiTrack Export ) contain multiple clips, which can each be configured separately if the Size value is set to a value greater than 1.
OMS Filename and MP4 Filename fields must include the local path to your OMS files, including the ‘.OMS’ or ‘.MP4’ extension (i.e. [subfolder]/[filename].OMS)
Ensure ‘Loop’ is enabled for continuous looping playback.
Once you have updated your OMS Player component, ensure you have both Scene and Game windows visible, and press ‘Play’ in the Unity editor.
Configuration example: Retargeting Setup
After configuring your OMS clip for playback, you may want to add Retargeting functionality. If your OMS fine contains the necessary retargeting data (a skeleton, a skin binding, and skin weights for one or more bones) you can perform the following steps to configure Retargeting playback:
Create a new Empty GameObject in your scene. This object will be used to provide an interface to your Retargeting Skeleton. This object can be named anything and placed anywhere in the hierarchy, but for organization purposes we recommend placing this object and your previously configured OMS player object side by side as children of another empty object. We recommend naming this object something easy to remember, like “Skeleton” or “Pose Target”.
With your OMS player selected, make the following changes:
In the Track Configs dropdown for your Clip, ensure that the ‘Size’ value is set high enough to include the track that contains retargeting. For most clips, this value should be ‘1’.
Expand the “Element 0” drawer to review the track configuration.
Enable the “Retarget” setting under Element 0.
Set the “Skeleton Root” field to point to your new Empty GameObject, created in step 2 above.
Click on the small Gear icon at the top right of your OMS Player (Script) in the inspector. In the dropdown, choose “Save Clip”. This will create a new Animation Clip object in your project’s root Assets folder, named after the player’s corresponding OMS file. Additionally, this will add the the skeleton hierarchy to your scene as a child of the GameObject you created in step 2.
Assign that new Animation Clip to the Skeleton Base Movement field in your OMS Player.
After correctly following these steps, your clip will be configured for Retargeting. Play back your unity scene to review your video. If configured correctly, it should play back correctly, like it did before configuring retargeting.
Once retargeting is configured, you can use any runtime unity scripts of your choice to animate the skeleton during playback. Changes made to the skeleton transformations will be applied to your OMS playback.
To set up Head Retargeting, we provide the SwingTwistLookIK script in the OMS Player unity package. You can configure it according to the following steps:
Add a Swing Twist Look IK component to your Retargeting object. This is the component you created in step 2 above, which was populated with the skeleton hierarchy.
Expand the “Bones” dropdown in the Swing Twist Look inspector, and set the size to “1”. This will expose an “element 0” field.
Assign your head bone in the Element 0 field. To do this, click and drag the “Head” bone (a child of your retargeting object > hips > back > shoulders) onto the element 0 field. This will specify the head bone transform as the gameobject for the script to act on.
Assign your head bone in the “Effector” field. Optionally, you can create a new child object for the head (such an empty gameobject, or a sphere) and supply that object as the effector. The effector will be used to determine the relative rotation of the selected bone to the look at target. Supplying a different object than the head lets you rotate that object to provide a rotational offset, which can be useful if the head is in an extreme pose, or the performer’s eyes are not looking straight forward.
Provide a Target object. Drag any object from your scene into the “Target” field. This is the object your Head Bone will be oriented to look at. This object is often the Main Camera in a scene, so that the volumetric actor can look directly at the viewer in a VR or AR app.
Configure the look at settings according to your needs. The default settings quickly track the target object within a narrow range in front of the actor. Several settings are provided for in depth configuration, with unity tooltips available on mouse over. For more details, see the Swing Twist Look Ik script reference.
Call SwingTwistLookIK.DoUpdate From the On Ik Needed () event on your OMS Player. Scroll down to the bottom of your OMS Player inspector and configure the On Ik Needed () Event. Press the “+” button to add a new listener. Drag your retargeting object (the object containing the swing twist IK script) onto the “None (Object)” field. Using the “No Function” dropdown, Select “SwingTwistLookIK -> DoUpdate()”. This will enable the OMS player to call the SwingTwistLookIK script to animate the skeleton.