Unreal: HoloSuite Player Requirements for VR Build Support
Note
This is a step by step guide to setting up an OMS Player in Unreal when building for VR.
For the reference documentation for the Unreal OMS Player Plugin, refer to the Unreal OMS Player Reference Documentation document.
Building VR-projects using OMS playback in Unreal engine requires some manual setup of the HoloSuite player and Media Player assets. For Holosuite player setup targeting non-VR devices please review the Unreal: OMS Player Configuration Example.
For more information on building to different targets and devices please review the Unreal Engine documentation.
OMS Player Configuration Example
After installing the HoloSuite Player Plugin 2022.1 for Unreal you can create a HoloSuite Player to use in your project.
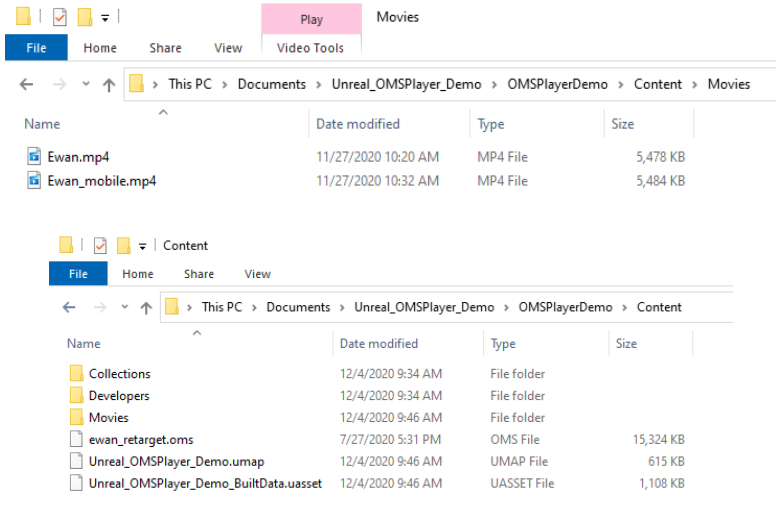
Next, add your OMS file(s) to the Content folder.

OMS Player Content in Windows Explorer
The operations for manually setting up a HoloSuite Player in Unreal requires multiple actors, blueprints, and objects, so you will want to keep these contained. We recommend creating a new folder for each OMS Player in your project. There are several components required to set up OMS Playback in UE4.
You will also need to create a folder named ‘Movies’ in the project. All .mp4 or texture sequences must be placed within the Movies folder to ensure OMS playback in standalone builds.
OMS Player Content in the Content Browser
A configured OMS player will require the following objects:
An OMSMeshActor: This drives the core of the OMS playback. It reads your prepared Materials and Media Player, and serves as the OMS player in your project’s map.
An OMS Mesh Material: You will need to create a material that uses the ‘ArcturusOMS’ node for the material’s texture information and World Position Offset. This is used as the Mesh Material parameter in the OMSMeshActor and can be created by right clicking on your OMS file in the content browser.
An OMS Media Player Material: You will need to create a material that uses the ‘Texture Sample’ node to playback the information provided by the Media Player Asset in order to apply the textures to your OMS’s meshes.
A Media Player Asset: This asset takes the provided MP4 textures and allows for playback of the texture and mesh animation.
A Media Texture Asset: This asset provides the Media Player with the mp4 or texture sequence required to provide texture and OMS playback.
To begin to set up an OMS player, create the following:
A Media Player: Double click on the object and ensure that ‘Play on Open’ and ‘Loop’ are enabled.
A Media Texture: Double click on the object and set the Media Player to the new MediaPlayer object that you just created.
Two new Materials: One of these is the Mesh Material, and the other the Media Player Material.
To create the Mesh material right click on the imported OMS file, select ‘Create Lit’ or ‘Create Unlit’ based on your project’s needs.
Then create a new material to use as the OMS Media Player Material. This material must be edited in the Material Editor. Add a Texture Sample node. From the Texture Sample node:
Connect the RGBA output into the Emissive input of the OMSTextureMaterial Result Node.
In the Texture Sample details, this node’s Texture should be set to the Media Texture you created at the start of the process.
In the “Place Actors Panel” Search for OMSMeshActor. Select and drag the OMS Mesh Actor into the Viewport.
This OMSMeshActor object is what you will configure to drive your OMS playback. It takes the assorted components required for texture and mesh playback and lets you determine the volumetric clip you intend to play.
To configure your OMSMeshActor to play your OMS and texture source, you’ll need to start by selecting the OMSMeshActor in the world outliner. In the “OMS Settings” category in the “Details” tab, assign your OMS file to the “OMS” field.
Next apply the OMS Mesh Material, using the dropdown select the OMSMeshMaterial you created for Mesh playback. The Mesh Material’s nodes drive the OMS playback, along with any custom shading you need for your project.
Use the arrow at the bottom of the Playback Settings to expose the advanced settings.
Set the Media player option to the Media player to the Media Player that was manually created earlier.
Set the Media Player Material to the OMSTextureMaterial.
You can position your OMS Mesh Actor now that it’s visible in the viewport.
HoloSuite Player in the level editor:
Be sure to review the Unreal or your device’s documentation for additional build configuration settings required for your target device.