HoloSuite Mari Tools
HoloEdit comes bundled with the HoloEdit Mari Tools, a toolset of scripts for use with Mari, a 3D Painting program created by Foundry. The HoloEdit Mari Tools scripts are compatible with your own copy of Mari 4.6v2 purchased through Foundry and work like any other Mari script or extension.
Overview
The HoloEdit Mari tools include import, export, and painting scripts to empower painting on temporally stabilized volumetric video in Mari. HoloEdit’s Mari tools separate imported data into frame ranges, allowing many artists to share the texture touch-up workload. These can be combined back together during export.
Requirements: The HoloEdit Mari Tools support Mari Versions 4.6v2 and 4.7
Installation
The HoloEdit Mari Scripts are located in your HoloEdit Install Directory, under the ‘Plugins/Mari’ subdirectory.
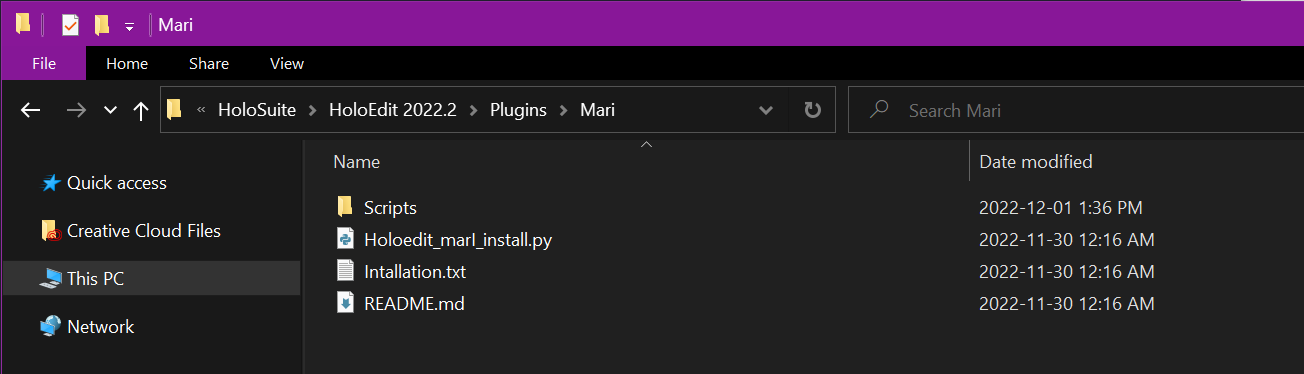
Copy the ‘Scripts’ folder, and paste into your Mari 4.6v2 install directory under ‘Bundle\Media’. This will allow the HoloEdit Mari tools scripts to run on Mari start up.
Mari Configuration
To take advantage of most HoloEdit Mari Tools features, you should set your Paint Buffer “Bake Behavior” to Clear Only. With this setting enabled, Mari will only bake textures after pressing the bake hotkey, default “B”.
Additionally, there are some optional settings we recommend when painting volumetric video with our scripts in Mari.
Painting panel
Paint Buffer Color Depth: ‘16 bit (half)’
Preferences
Virtual Texture Type: ‘Half’
Note
Addtionally, if you experience long delays baking textures with Links, a very low (1-2) Virtual Texture Layer Count setting may produce a speed up.
Preparing Data in HoloEdit
HoloEdit provides a “Mari” export preset under the “Workflows” output type. Exporting your Track using the Mari Workflow will produce matching UDIM obj and png files for use with the Mari import script.
Warning
The Mari export format is recommended for Stabilized data only. Unstabilized clips may perform poorly after Mari import, and not all features of the Mari scripts are supported.
Mari Import
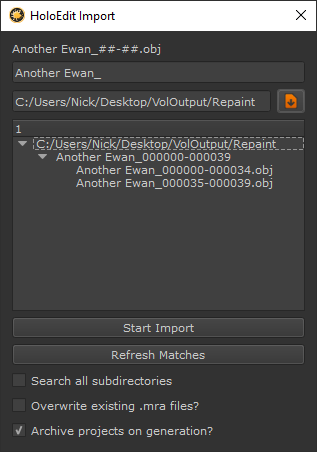
The HoloEdit Import Script can be accessed at any time from the HoloSuite entry on the Mari Menu Bar. The Import Script opens a new window with the following fields:
Name Prefix: The Text Field at the top of the HoloEdit Import UI is used to type in the prefix of all of your Mari export files. This should be the same as the export name you chose for your “Mari” workflow export in HoloEdit, followed by an underscore. This field is case-sensitive.
Path: The Path Field below is used to specify a path to search for projects. Use the orange path select button to the right of the field to open the Mari file browser, and select a folder containing the files you’d like to import.
The Import Preview Field: The Import Preview Field is the large box in the center of the Import window. When a path and prefix that match UDIM files exported from HoloEdit have been supplied, this field will populate according to the Mari Projects that will be created. See “Import Preview Details” below for more information on the contents of this field.
Start Import Button: The Start Import button begins the HoloEdit Import Script process with the current configuration
Refresh Matches Button: This Button refreshes the matches in the Import Preview Field.
Search All Subdirectories Toggle: With search All Subdirectories enabled, the Import Script will search all subdirectories under the provided path for files that match the Name prefix, and create Mari projects at each corresponding subdirectory. Default: Off
Overwrite Existing .mra files Toggle: With Overwrite Existing .mra Files enabled, the import file script will re-generate projects that already have matching .mra files in the target directory. Default: Off
Archive Projects on Generation Toggle: With Archive Projects On Generation, the Import Script will export each generated project as a Mari Archive and then delete the non-archived version. These Archives can then be imported individually. This setting is recommended on large projects unless you know for sure that you want to skip archiving. Default: On
Import Preview Details
The HoloEdit Import script works by splitting each volumetric clip detected into smaller sub-sequences for better performance and easy editing in Mari. When you enter a valid Name Prefix and Path, the Import Preview Field will populate with a tree view representing what will be imported.
The first layer of the tree view represents each detected path. By default, there will only be one path present, but with the Search All Subdirectories setting enabled there will be one for each subdirectory containing files matching the provided prefix.
You can expand these entries to see a preview of each Mari Project that will be created. Mari projects target approximately 60 frames each, but the size can vary significantly depending on the length of the Stabilized Segments included in the Clip. Most Clips will be broken up into multiple Mari Projects, which will be visible here. When Archive Projects on Generation is enabled, Mari Archives for each of these projects will be created in their respective directories.
Expanding a project entry displays the Individual Segments that make that project.
Mari Painting Tools
The HoloSuite Tools Panel can be used in combination with a Mari project created by the HoloEdit Import Script to quickly navigate between frames and access powerful tools for painting on Volumetric Video Sequences.
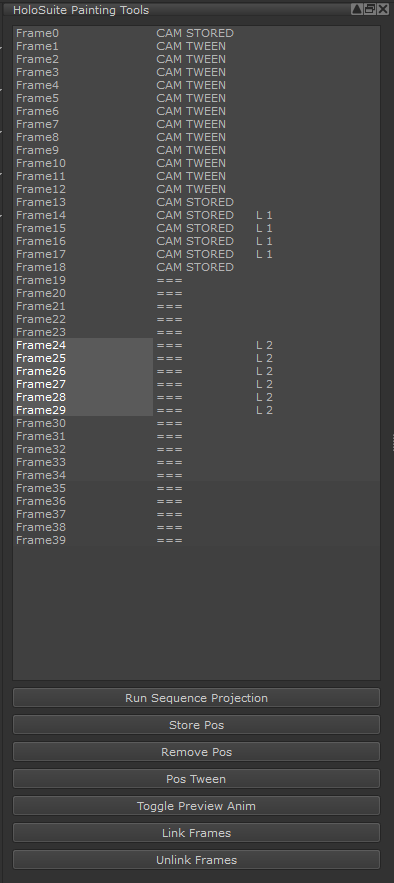
The HoloSuite Painting Tools panel is contains the following elements:
Frame List: The Frame List field displays a row for each frame in your Mari Project along with additional per-frame information. See Frame List Details below for more information.
Sequence Project button: The Sequence Projection button runs the Sequence Project step on the selected frames. See Sequence Projection below.
Store transform button: The Store Transform button stores the current Camera and Paint Buffer transformations to the selected frame(s). See Stored Transformations below for more details.
Remove transform button : Removes the current stored transformation for each selected frame
Pos Tween button: Generates “In-between” stored transformations between exactly two selected transformations via linear interpolation. See Stored Transformations below for more details
Preview animation toggle: Previews the current file by stepping through the clip at 30 frames per second
Link frames button: Creates Frame Links over the selected frames. See Link Frames below for more details
Unlink frames button: Removes Frame Links from the selected frames
Frame list Details
The Frame List takes up the majority of the HoloSuite Painting Tools panel. This allows you to select any frame in your current Mari project, and displays the stored transformation and link status for each frame. Vertically, this list contains each frame in the current project. The background color of the list alternates to indicate each Stabilized Segment.
You can select a frame by clicking on its name, and multi-selections are supported with shift + click, ctrl + click, and click and drag. In addition to mouse controls, you can select frames by stepping forward and backwards using the “W” and “Q” hotkeys.
Finally, there are two more columns to the right of the frame number. One for Stored Transformations, and one for Links. Both should be empty after opening a new project, but will update as you add new links and transformations.
Sequence Projection
Sequence Projection is a tool that projects the current paint buffer on to multiple selected frames in sequence.
To use Sequence Projection, select two or more frames from the Frame List, and press the Sequence Projection button. The HoloSuite Tools Script will step through each selected frame one at a time and project the current paint buffer.
Important
If a Stored Transformation is present on a frame during sequence projection, that stored camera and paint buffer transformation will be applied before projecting, and remain for subsequent frames unless replaced by another stored transformation.
Stored Transformations
Stored Transformations contain a record of a camera and paint buffer transformation saved to a frame by a user of the HoloSuite Mari Tools. Stored transformations can be added by pressing the “Save Pos” button in the Tools Panel, or by pressing the hotkey “E”.
When you store a transformation, that transformation will be used whenever Sequence Projection is run over that frame. The stored transformation can be restored by double clicking on the corresponding frame in the Frame List.
Additionally, the Hotkeys “Ctrl+Q” and “Ctrl+W” are used to step forward and backward in the frames list and apply the current transformation on each step.
Note
For all processes involving Stored Transformations, frames without a current stored transformation will use the existing camera and paint buffer position – such as from the last stored frame in a sequence projection.
Link Frames
The Link Frames functionality lets you transfer paint between multiple frames in a single Stabilized Segment in uv space. This way, paint sticks to the surface. You can often link several frames and then paint only on one frame to propagate the change to each.
Links can be added by selecting two or more frames and pressing the Link Frames button.
Note
Links are only possible within a given Segment, so if you make a selection that spans two or more segments and press the “Link Frames” button one link will be created for each segment. A frame’s current links can be previewed in the third column of the Frame List, with “L” for link and then the link number. All frames with each unique link number are linked together.
When projecting paint onto one linked frame, Mari will pause to transfer the projection onto each frame in the current link. Because this calculation takes time, we recommend that you only create links when you need to transfer a large amount of texture across multiple frames, and remove links after you’re done using them.
Warning
Because Sequence Projection performs a projection for each frame, you shouldn’t use Sequence Projection in combination with Links across a single segment, since the link will be executed once for every single frame linked in the sequence projection.
Mari Export
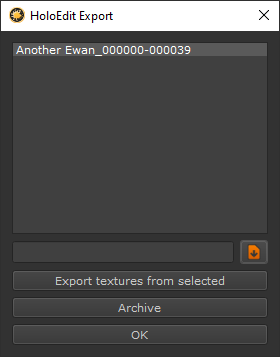
The Mari Export Script can be accessed at any time from the HoloSuite entry on the Mari Menu Bar. It should only be used when you don’t have a current project open in Mari.
The Export Script creates a new window with the following fields:
Project List: The list at the top of the window displays the current Mari Projects on your computer. You can make selections in this list with left click, shift click, ctrl click, and click and drag. The selected projects will be exported using the options below.
Path: The Path Field below is used to specify a path to export your project(s). Use the orange path select button to the right of the field to open the Mari file browser, and select a folder where you’d like to export your files.
Export textures from selected: For each selected project, the HoloEdit Export Script will export the project’s textures as sequentially named PNG files.
Archive: For each selected project, the HoloEdit Export Script will save an archive of the project to the selected directory and delete the current instance of the project.
OK: Closes the Export window.