Algorithm Deep Dive: Deformation
To achieve stabilization, the Stabilize Mesh and Match Template Mesh stages use a process called Deformation. The Deformation process deforms the source mesh to match the pose of the target mesh for each frame. After deformation, a new result mesh is produced.
Note
This page provides background on one of the algorithms used in HoloEdit. If you’re just getting started with HoloEdit, or intent to only use default settings in the Stabilize Mesh or Match Template stages, this section isn’t necessary to understand how to use HoloEdit.
The Deformation Algorithm
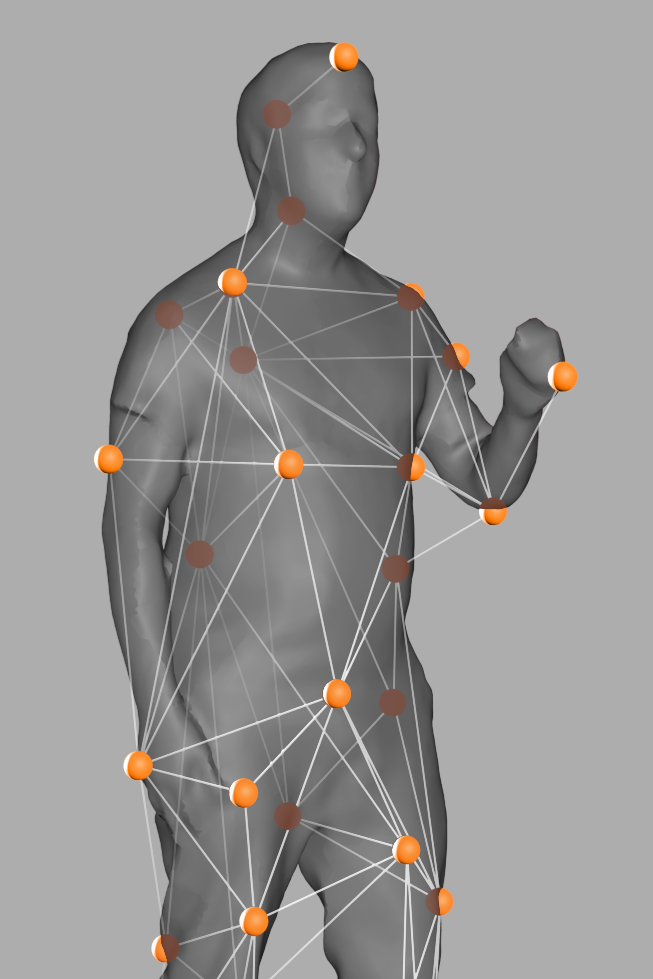
 Left: ‘Nodes’ are spread across the surface of the mesh. Right: Each node has an Influence Region where it exerts deformations on the mesh.
Stabilization uses a process called “Non Rigid Deformation”, where a lattice of Deformation Nodes are created and used to deform the mesh based on the properties of Correspondence Pairs, which each contain one vertex on the source mesh and one similar vertex on the target mesh.
These nodes are iteratively deformed based on the Correspondence pairs, with new pairs and new deformations applied repeatedly to deform the source mesh closer and closer to the target mesh, until it eventually reaches a best possible fit.
To understand the stabilization process, you can focus on 3 major pieces of the process:
Correspondence
Nodes
Iterative Deformation
Correspondence
Correspondence determines which point on the keyframe being deformed matches which point on the surface of the target mesh. This will set the target of where the two surfaces need to match to be considered a successful deform. There are two approaches when the deformation algorithm is generating correspondence pairs.
Closest Point
Closest point pairs are identified for each vertex on the source mesh based on the Match Distance Limit and Match Cosine Limit settings. The closest match within the distance and cosine limits is used to complete the ‘pair’. If no matches exist, no pair is created from that vertex.
This works best in lower action clips where the normal direction and distance between the source and target mesh do not drastically change within a deform work unit.
Nodes
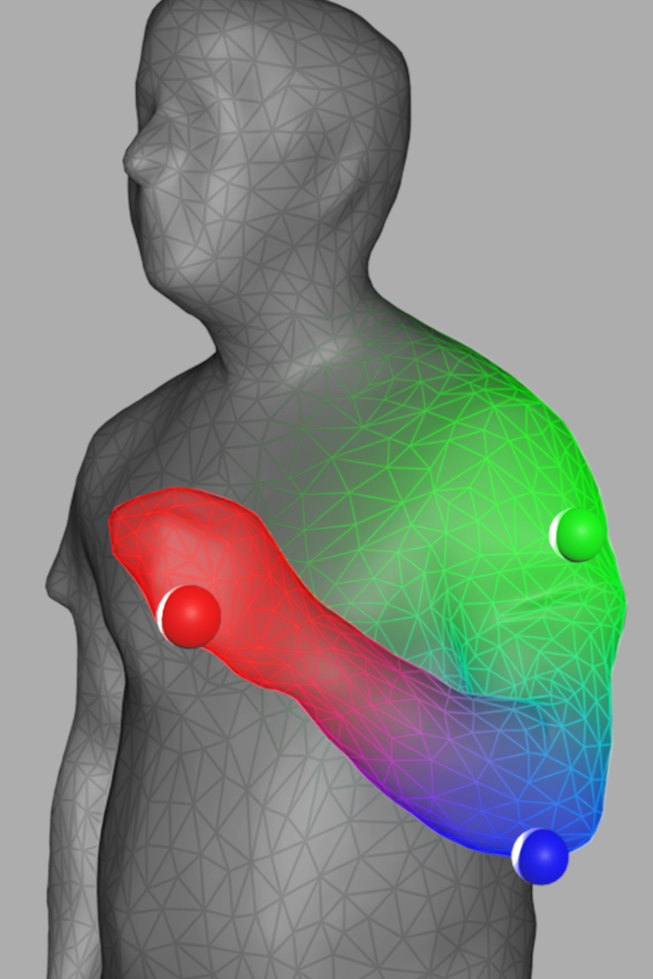
The Deformation process uses a lattice of nodes to drive deformation. Compared to using every vertex on the mesh, using a relatively small number of nodes allows fast, efficient transformation, while also better capturing coarse, stiff motions, like changes in pose.
The total number of nodes depends on the Sample Radius – smaller Sample Radius Factor values produce more nodes. Larger numbers of nodes may capture fine motion more accurately, but processing time grows significantly for each additional node.
Note
The ‘Sample Radius’ is calculated using the Sample Radius Factor value. This is multiplied with the average edge length of the source mesh to produce the final Sample Radius.
Within each Sample Radius, a node influences nearby vertices. The strength of the influence gradually decays to nothing at the end of the Sample Radius. Nodes are distributed evenly using the sample radius such that every vertex on the mesh is influenced by at least one node.
When a node is moved, scaled, or rotated, all of the vertices it influences inherit the same transformation based on their degree of influence by the node.
Important
Nodes are required to drive deformations of large shapes, like changes in pose, but finer grained surface details can still be captured with only a relatively small number of nodes.
Hierarchy Node Sampler
The Hierarchy Node Sampler is an optional process that can be enabled for deformation stages.
It works by generating a hierarchical list of possible nodes to be deformed. The stage parameter ‘Hierarchy Node Sampler Node Cap’ determines the max number of nodes in the hierarchy as a percentage of the mesh’s vertices, which are then down sampled in steps to create the node hierarchy. In an example where you have a mesh with 10,000 vertices and the ‘Number Of starting Nodes’ parameter set to 0.01 your processing will not be able to exceed 100 nodes.
Preliminary processing is done using the mid level hierarchy to form a uniformly sampled mesh while having few enough nodes to be able to efficiently process deformation. Additional nodes are generated based off of the amount of motion between the key frame and target mesh, this is done by automatically placing nodes in areas with high Smooth Energy. Smooth Energy is calculated by taking the degree to which the motion in one node affects the motion in another, larger more dynamic movements will generate more Smooth Energy. This method will create an expansion of nodes in high movement areas of the mesh to better capture the quality of details in clips with higher movement, without generating unneeded nodes in areas of the mesh with little motion.
Iterative Deformation
The Deformation process is iterative, with each iteration using the result of the previously deformed iteration. This way, the Stabilize Mesh stage gradually approaches the correct Pose for each target mesh. Each iteration contains two steps: Identifying Pairs, and Deforming Nodes.
Using the correspondence pairs, the lattice of nodes begins a deformation iteration to try to best fit the target mesh. Rather than freely deforming to try and reach the target pairs, nodes are constrained by their neighboring nodes, based on what are called Regularization Weights. These weights, configured by the AlphaRigid and AlphaSmooth parameters, respectively stiffen the lattice of nodes so that individual nodes cannot move freely without sufficient strength, and connects the lattice of nodes so that an individual node that moves drags its neighbors behind it.
With the limitations of the Regularization Weights, after moving to produce a best fit, eventually the nodes will settle into a position with very little freedom to continue deformation. At this point, the iteration ends, and the next iteration begins. On the next iteration, and each subsequent iteration, the AlphaRigid Regularization Weight is decreased by half to introduce more freedom of movement, and pairs are re-calculated based on the new, deformed position of the source mesh.
Through this process, the source is gradually deformed to the target pose, initially with fewer pairs and stiffer motion, and gradually with more free motion as the Deformed source Pose begins to more closely resemble the target pose.
Finally, when the rigidity term has been fully relaxed, the stabilization algorithm is complete. After completion, the resulting mesh is compared against the target pose to measure the degree of error in the deformation. If the pose error is under the threshold provided by the Segment Max Error setting, the resulting deformed mesh is added to the segment to replace the original target mesh. If the error exceeds the max error threshold, it is discarded, and the process begins again with a new source.