The Inspector Panel
The Inspector Panel displays details and settings based on your current selection in HoloEdit. The Inspector is used to configure edits to stages, tracks, and intervals, along with reviewing clips and other data in HoloEdit. The Inspector is blank when a new composition is opened, and is populated based on the selected clip, stage, track, or interval.
Each Inspector is made up of one or more of the following parts:
Inspector Header
The Interval Header at the top of the interval contains the name of the current selection, plus additional details and controls depending on the setting. The Header is made up of the following:
Description

The top portion of each inspector displays the name of the item selected, along with a brief description. The description varies by selection type, and typically includes details for the data included. Interval inspectors display the name of the current stage. Stage inspectors display the name of the current stage, and additionally display the stage type if the selected stage has a custom name.
Navigation Arrows


Navigation arrows will appear on Interval and Stage Inspectors for quick navigation of the composition.
Up and Down arrows will appear to the right of the description when a stage is selected. These buttons select adjacent stages in the current track.
Left and Right arrows will appear to the right of the description when an interval is selected. These buttons select the next and previous intervals in the current stage.
Selection arrows will appear greyed out when there is no neighboring item to select.
Interval Range

On Interval inspectors, the Interval Range item will appear directly under the description. This item contains two text fields, one for the start time of the interval, and another for the end time. These fields can be toggled between Timecode and Frame representations by pressing the “s / f “ toggle to the right.
Entering a value and pressing enter will set the interval to the new start and end times. Modifying the Start Time will also change the End Time to preserve interval length. Changing the End Time will scale the interval as needed. Setting the end time before the start time will have no effect.

Inspector Categories
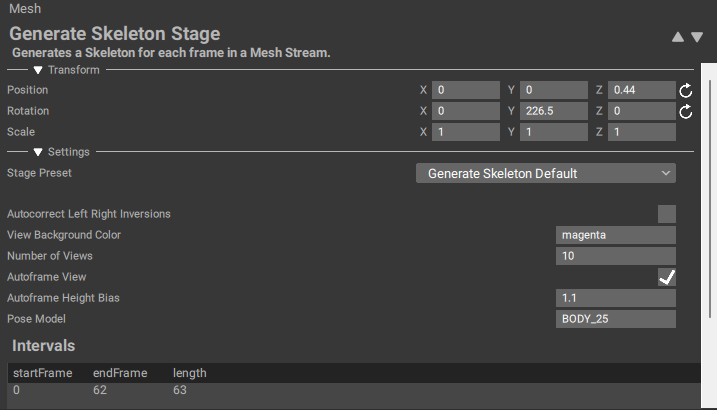
Inspectors may be made up of multiple categories, separated by the category name and a thin line at the top of the section. Categories can be hidden or expanded by pressing the disclosure triangle to the left of the category Name. In HoloEdit there are two common Categories, ‘Transform’ and ‘Settings’.
Transform

The Transform Category appears on any track, stage, or interval Inspector. This allows the user to set the track’s position, rotation, and scale within the composition. There are fields corresponding to the X, Y, and Z axis for Position, Rotation (in degrees), and Scale. At any time the Position, Rotate, or Scale transformation can be reset to the default values by pressing the Reset button to the right of the fields.
Settings
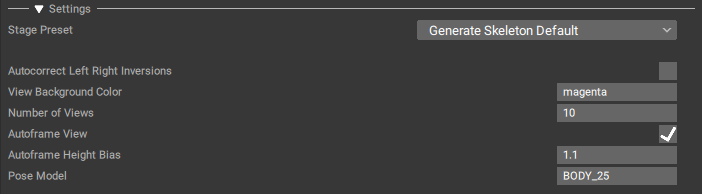
The Settings category provides configurable settings for stages and intervals.
Stage settings can be configured via clicking on the entry field to the right of the setting name and entering a new value, or by clicking and dragging to the left of any numeric setting to scrub the value.
Settings can be in one of two states: Default and Modified. When a stage or interval is created, every setting is Default. Any setting that has been configured by a user is modified. Modified settings can be identified by the “Reset” button to the right of the entry field. When a stage is selected, pressing the Reset button will revert the setting to the default value provided by HoloEdit.
The Default and Modified states take on extra significance in the context of intervals. With an interval selected, Default settings are driven by the current stage settings. When stage settings are modified the changes propagate to every default setting in the corresponding intervals. Stage-wide intervals can be quickly adjusted for all of your intervals, but individual settings can be overridden as needed per interval.
When multiple intervals are selected via click-and-drag, or shift click on the Timeline, only the most recently selected interval will be displayed in the Inspector.
For details on individual stage settings, refer to the Stage Types documentation.
Presets

At the top of the settings section of the inspector is the presets drop down menu. If you have a track selected this lets you save and load sets of stages for particular workflows. If you have a stage selected it can save and load stage settings to all intervals in the stage. If you have an interval selected it will save and load stage settings to that interval.
For more information on presets please refrence the Presets Section of our docs.
Data Review
Clip and Data Inspectors contain additional items for inspection and review.
Data Stream Table
A tabbed table of data streams is displayed on the interval and clip Inspectors.
This table contains tabs for each data stream present in the selected object with detailed information per item in the stream. The columns of the table are particular to each data stream type.
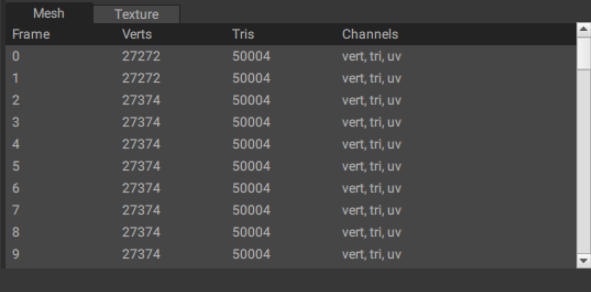
Mesh
The Mesh Data Stream Tab displays the vertex count, triangle count, and vertex data present on each frame.
Frame: Displays the row’s frame number
Verts: Displays the frame’s total vertex count (with unique vertices for normals, uvs, etc)
Tris: Displays the frame’s total triangle count
Channel: Displays a list of data types (uvs, normals, etc) present on this frame’s mesh
Texture
The Texture Data Stream Tab displays texture information per frame
Frame: displays the row’s frame number
Size: displays the frame’s texture size
Channels: displays the number of channels present in each texture (typically 3, for rgb images)
Depth: displays the color bit depth of each texture
Anim
The Anim Data Stream Tab displays the rigging information per frame
Frame: Displays the row’s frame number
Joints: Displays the bone count per frame
SkinBinding
The SkinBinding Data Stream Tab displays skinning information per frame.
Frame: displays the row’s frame number
Weights: Displays the number of vertices with skin weight data
Indices: Displays the number of indices with skin weight data
MVE
The SkinBinding Data Stream Tab displays Multi View Environment information per frame
Frame: Displays the row’s frame number
Views: Displays the number of capture views per frame
Intervals Table
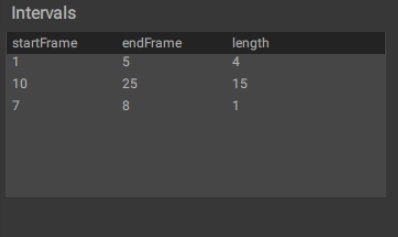
A table of Intervals and their frame ranges is displayed at the bottom of the stage Inspector.
Each row of the intervals table represents one interval, with columns for Start Frame, End Frame, and Length for each interval. Each of these three values can be selected via left-click and manually edited. Entering a new value for the Start Frame will also change the End Frame to preserve interval length.
Preview Display
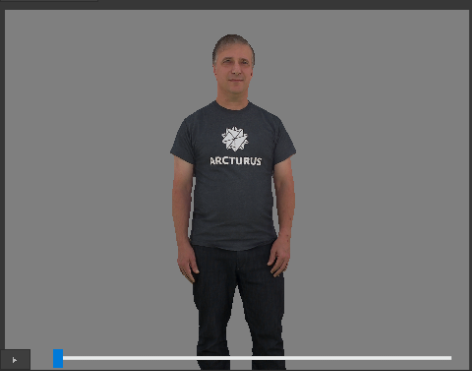
The Preview display is visible in the intervals for clips and data files selected in the Project Panel. Various data types offer different Preview Displays.
Clip: The Clip Preview Viewport can be used to preview the whole clip. Seek or play the animation using the play bar at the bottom of the preview viewport. For 3D clips, rotate with RMB as with the main Viewport.
Image: The Image Preview Displays the selected image scaled to fit the inspector window.
Mesh: The Mesh Preview Display renders the selected mesh in a viewport scaled to fit the inspector window.
Audio: The Audio Display renders a waveform with play/pause controls to preview the audio clip.