Retargeting
Note
This is a step by step guide to setting up OMS playback in Unreal with retargeting using the HoloSuite Player. If you are already familiar with retargeting in HoloSuite Player, be sure to review this updated documentation, as the configuration and workflow has been significantly improved and simplified.
For the reference documentation for the Unreal HoloSuite Player Plugin, refer to the Player Reference Documentation.
Note
Actor attachment is now also available in the HoloSuite Player. This feature allows users to attach any type of UE actor onto any bone of the skeleton encoded in an OMS or AVV file.
Further details are provided after the Retargeting section.
One key feature of OMS Playback is Retargeting. Retargeting allows you to dynamically re-pose your volumetric capture like any other Skinned Mesh in Unreal without disrupting playback.
Configuration
One common usage of Retargeting is “Head Retargeting”, using the head bone to make the volumetric actor look at an animated object or camera in the scene during playback. Clips can be prepared for Head Retargeting in HoloEdit using the Generate Skeleton and Generate Skin Weights For Head Retargeting stages without any manual editing.
Inside Unreal Engine, you must configure a Skeletal Mesh, Skeleton, and Animation Blueprint to enable retargeting. The components of Retargeting are as follows:
SkeletalMesh: The SkeletalMesh component must be created automatically from any OMS containing rigging data.
Skeleton: The Skeleton component must be created from the SkeletalMesh component.
Retargeting Blueprint: Retargeting uses an Animation Blueprint to drive animation during playback.
The creation and configuration of these assets is explained next.
Head Retargeting
To add head retargeting data to your player, first configure a standard HoloSuitePlayer actor as described in section Getting Started and ensure it’s playing correctly in the viewport.
Next, in the Details panel of the HoloSuitePlayer instance, enable the Enable Skeleton and Enable Retargeting parameters, available in the Skeleton section. Then, proceed with the creation of the missing assets.
To create an OMS Skeletal mesh, right-click on an OMS file in the Content Browser and choose “Create Retarget SkeletalMesh” from the OMSActions section. Note that this action will only work if the source file has been exported with valid retargeting data.
The Skeleton component must be created via right-clicking on the SkeletalMesh component and choosing “Create Skeleton” from the “Skeleton” category.
To create a Retargeting Blueprint, create a new Animation Blueprint, its configuration is explained next.
Once you have these 3 assets created and saved, go ahead and configure your HoloSuitePlayer instance with the SkeletalMesh as the Player Skeletal Mesh and the Retargeting or Animation Blueprint as the Retargeting Animation.
Retargeting Blueprint:
Adding an Animation Blueprint is what enables head retargeting to lock onto a target object and control your actor’s head motion during playback.
For example, you can add a Look At blueprint using the following steps:
First create a new Animation Blueprint from the Animation dropdown menu. Animation Blueprints must be provided a target skeleton. Select the skeleton you generated in the previous steps and press the “ok” button. Open your Animation Blueprint to expose the AnimGraph window. In the AnimGraph, you will see an empty Output Pose node.
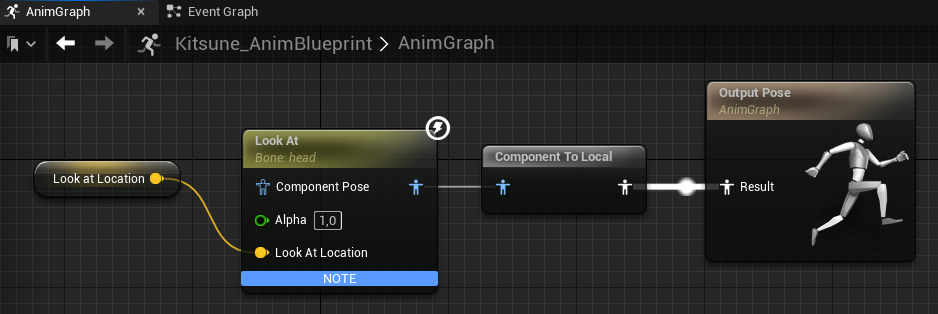
First, Create a Look At node and connect its output to the Result of the Output Pose. With the Look At node selected, update its Details as follows:
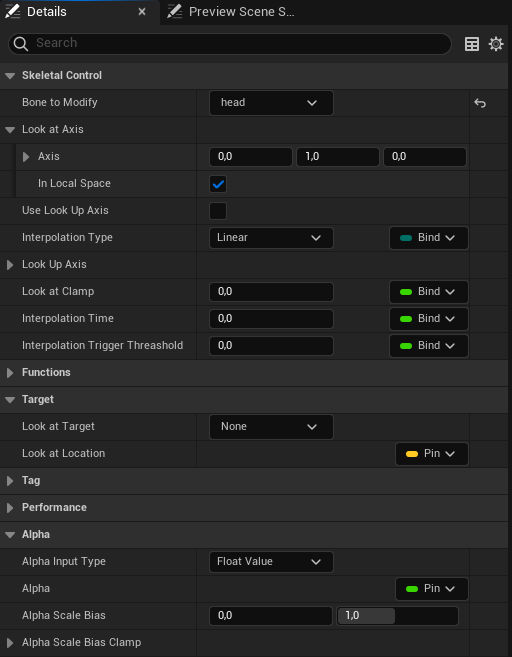
Update its Bone to Modify to ‘head’
Expand its Look At Axis, and set the the values to 0.0, 0.0, 1.0
Next, Compile and Save the Animation Blueprint.
Adding a look at object
In order to get a useful result, you’ll also need a target for your ‘Look At’ script to point the head towards.
Place a new object in the scene. For example, a primitive such as a sphere.
In the Animation Blueprint, select the Look At node and in its Details panel, check the “Expose” checkbox next to the Look At Location setting in the Target tab.
This will expose the Look At Location pin in the AnimGraph.
Next, add a variable to use as the look at location, and in the Details tab set its variable type to Vector.
Drag your new Vector variable into the AnimGraph as a Get node and connect it to the Look At Location input of the Look At node.
Next, switch over to the Event Graph of the Animation Blueprint. Add the following assets and connections between the nodes:
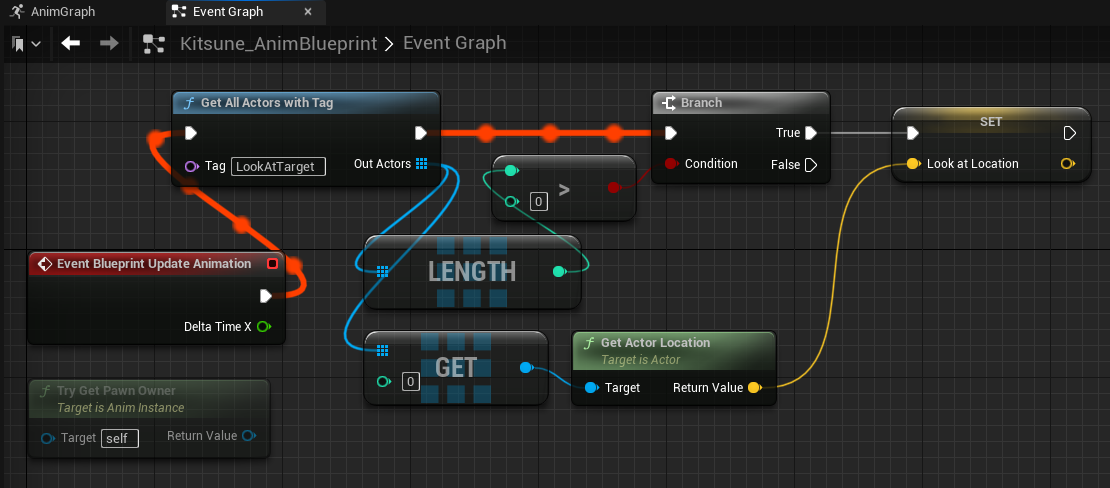
Pull from the “Event Blueprint Update Animation” exec pin and Create a Get All Actors with Tag function; in the node’s Tag field, specify any name for a tag. For this example, use “LookAtTarget”.
Click on the Get All Actors with Tag Out Actors output and create a Get (a ref) node.
Click on the Get node’s output pin and create a GetActorLocation node
Drag out from the GetActorLocation node’s Return pin and create a Set node for your vector variable.
Connect the Get All Actors with Tag node’s Exec output to the Set node’s Exec input.
Compile and Save your Animation Blueprint
In the viewport, select the primitive ‘look at’ object that you added to your scene.
In the object’s Details panel, navigate down to the Actor tab and add a Tag element. In the new field that is created below, add the ‘LookAtTarget’ tag that you entered in the Get All Actors with Tag node.
The HoloSuitePlayer is fully configured. Select ‘Play’ in the viewport toolbar, moving your target object will now cause the actor’s head to follow the target.
Actor Attachment
Note
This is a step by step guide to attach UE actors onto skeleton bones of a HoloSuite Player.
For the reference documentation for the Unreal HoloSuite Player Plugin, refer to the Player Reference Documentation.
While the HoloSuite Player offers the ability to retarget volumetric actors using OMS input files, it also leverages Unreal’s Skeleton system for another use case. That is the ability to attach any type of UE actor onto any bone of the skeleton encoded in an OMS file. Attached objects, particles, lights or whichever other type of actor will follow the movement and rotation of the selected bones, allowing the enhancement of volumetric performances.
Although the AVV codec does not yet support retargeting, it is ready for actor attachment as well. In this section, you’ll be guided on how to configure a HoloSuitePlayer actor with this feature. The example configuration focuses on OMS, but the workflow is similar for AVV.
Configuration
To export an OMS or AVV file from HoloEdit with skeleton data, the workflow is similar to that of retargeting, except for the fact that the Generate Skin Weights stage is not required as only the skeleton will be used to attach actors.
Inside Unreal Engine, you must configure some assets to enable actor attachment. The components of Actor Attachment are as follows:
SkeletalMesh: The SkeletalMesh component must be created automatically from any OMS or AVV containing rigging data.
Skeleton: The Skeleton component must be created from the SkeletalMesh component.
The creation of these assets has been explained in the Retargeting section, the only difference being that users may choose the “Create Actor Attachment SkeletalMesh” action instead of the “Create Retarget SkeletalMesh” fir the creation of the first asset. This action will only be available for OMS or AVV files exported with skeleton data.
To define which bones from the skeleton will be used as targets for the attachment, open the skeleton tree by double-clicking on the generated Skeleton. Next, right-click on the desired bone and choose “Add Socket”. You can name the socket however you prefer, but we recommend keeping the default name. Repeat the step for each target bone. After that, you’re ready to configure the HoloSuitePlayer.
HoloSuitePlayer Actor Attachment child Class:
There’s more than one way to create the links between bones (or sockets) and scene actors. In this example, we approach this through the creation of a child Blueprint of the HoloSuitePlayer actor class, as it is the recommended workflow.
Use the search bar in the “Place Actors” tab to locate HoloSuitePlayer actor and click and drag it into your scene to create a new HoloSuitePlayer instance. Once you create the new instance, select it in the “World Outliner”, click on the blue Blueprint/Add Script button on the “Details” panel and create a subclass. Name it and save it at your discretion, and then open it on the Blueprint Editor.
For each actor you wish to attach to the volumetric player, create a public variable of the corresponding type. Then, for each of these, create a reference to “self” (the HoloSuitePlayer) and call the Attach Actor To Skeleton function with the HoloSuitePlayer as the “Target” and the actor to be attached as the “Actor”. You also need to write the name of the socket of the desired bone.
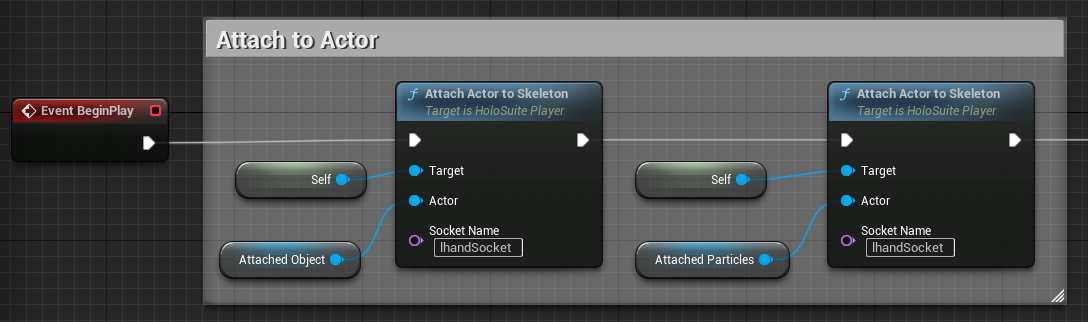
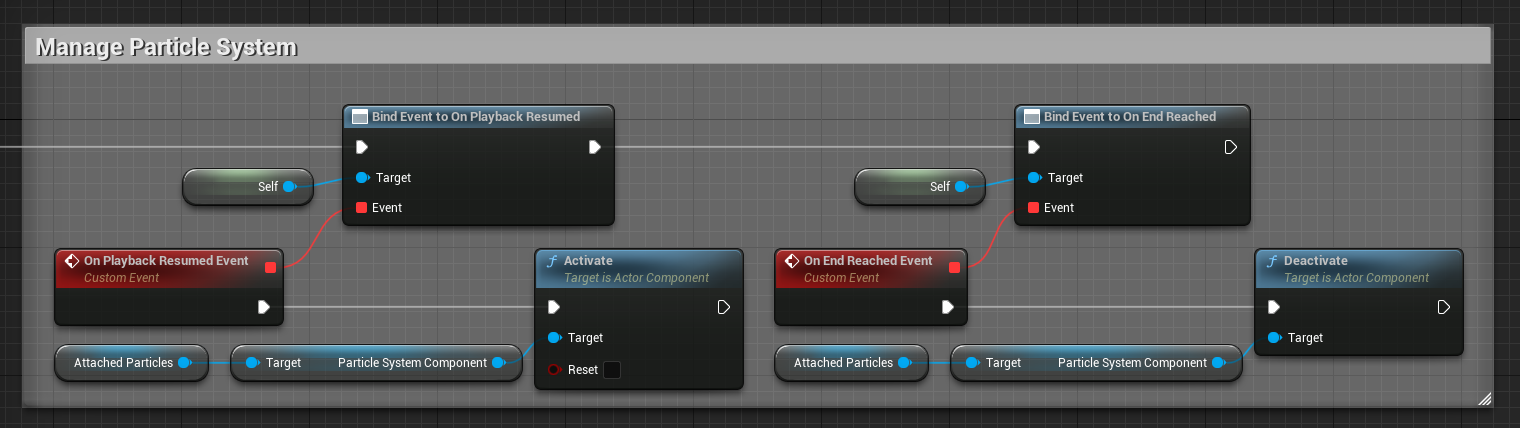
Save and compile changes to complete your configuration. You may include additional functionality afterwards. In the example below, we add some Particles controls tied to the start and end of the volumetric video.