Depthkit Capture tool
This guide covers the basic steps required to prepare Depthkit captures for use within HoloEdit
Similar to the Mesh Capture Tool, the Depthkit Capture Tool is a unity package which exports meshes and MVE textures for further editing in HoloEdit.
Overview
To convert a Depthkit capture into a set of OBJ mesh files and MVE textures, we need to render the Depthkit data using the Depthkit Unity plugins. Once rendered we capture the data required to convert it for HoloEdit import. The meshes and MVE files are then ready to be imported into HoloEdit for further processing.
Getting Started
To begin you will need:
Unity 2019.4 LTS
Depthkit Unity packages - provided by Depthkit
Depthkit Core 0.9.0
Depthkit Image Sequence Player 0.1.3
Depthkit Studio 0.5.1
Depthkit Studio Mesh Sequence Export 0.1.2
Depthkit Capture 2021.2.2.unitypackage - found in the HoloSuite Tools folder
Depthkit files
Depthkit .MP4: This contains the mesh and texture data
Depthkit .txt: This contains the metadata of the camera locations used to capture the Depthkit data.
Depthkit Poster .PNG: This file contains a single frame of the Depthkit data. It is used to generate a static sample of the Depthkit data. (Optional)
Create a new Unity project, or open an existing one. Ensure the project is updated to the latest version of Unity 2019.4.
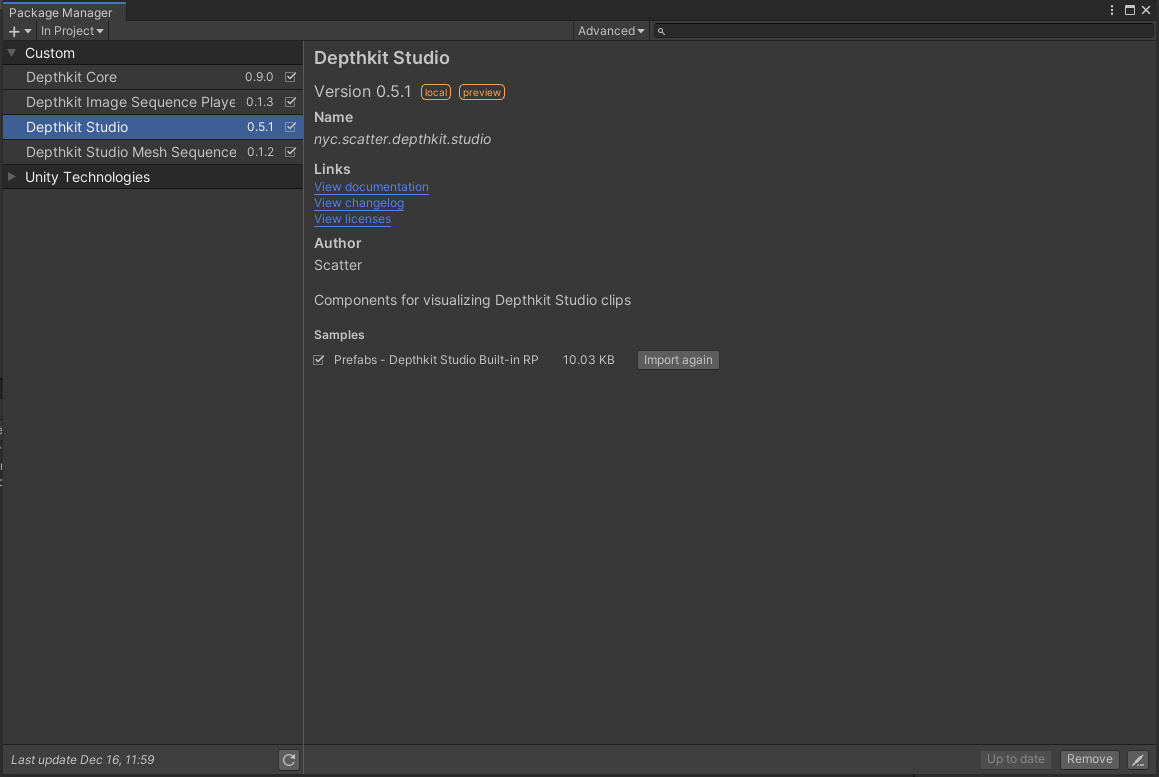
Ensure that you have all of the required Depthkit provided packages loaded in the package manager.
To check this, open the package manager using the Window Menu, and selecting Package Manager. Set the package filter in the top left of the Package Manager window to In Project. This will limit the displayed packages to only packages currently in your project. You should then see the Depthkit plugins as shown in the screenshot below.
If you do not have these packages in your project you must add them before being able to move forward with converting the DepthKit captures to Mesh and MVE files.
You will need to import the Depthkit Capture Package from Arcturus.
Using the Asset Menu option select Import Package -> Custom Package.
In the browse window navigate to the Depthkit Capture 2021.2.2.unitypackage located in the HoloSuite Tools folder, and click Open.
In the import window that opens, ensure all of the below files are selected, and click Import.
Scene Setup
Once all necessary plugins are installed the first step is to add the required objects and prefabs to the scene hierarchy.
The two required objects are:
Depthkit Clip + Studio Built-in RP Look prefab
Depthkit Capture Prefab
Find the Depthkit Clip + Studio Built-in RP Look prefab in the Project Panel under Samples -> Depthkit -> 0.5.1 -> Prefabs. Drag the Depthkit Clip + Studio Built-in RP Look prefab into the Hierarchy. As this prefab is acting as the Depthkit player, rename it by right clicking this Object set the name to ‘Depthkit Player’.
Find the Depthkit Capture Prefab in the Project Panel under Assets -> Arcturus.Volumetric -> Prefabs. Drag the Depthkit Capture prefab into your Hierarchy. The Depthkit Capture Prefab works to capture the data once rendered to generate the Mesh and MVEs.
MP4 Capture and Image Capture
There are two forms of depthkit data supported by the Depthkit Capture tool: Mp4 data and Image data. Mp4 capture ingests an mp4 version of your depthkit data by configuring the Video Player component on your depthkit clip. Image capture imports an image sequence driven by a unity timeline. For image sequence driven capture instructions jump to Image Capture instructions.
Mp4 Capture
Create and name a new subfolder in the root of your Assets directory, place the depthkit data you want to convert into the subfolder.
Note
If you have more than one clip to capture, you may want to make individual subfolders to more easily track your clips.
Depthkit Player Configuration
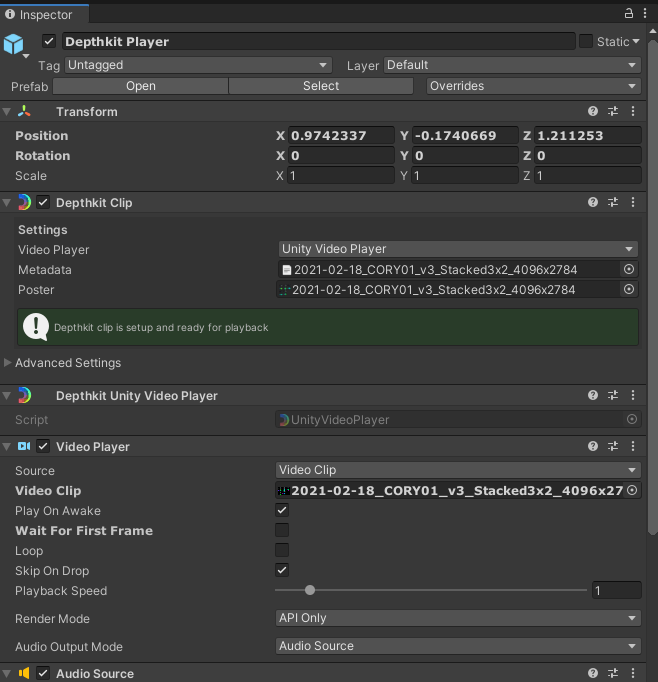
First, configure the Depthkit Clip component. The following settings should be adjusted:
Video Player: Ensure this option is set to Unity Video Player
Metadata: Set the Metadata field to point to the metadata .txt file included with your Depthkit data.
Poster: To enable an editor mode preview of your clip, update the Poster field to point to the poster file included with your Depthkit data.
Next, configure the Video Player:
Video Clip: Set the Video Clip field to point to the mp4 file from your depthkit data.
Play On Awake: Disable Play on Awake.
Playback Speed: Set Playback Speed to 0.
Note
As soon as you configure the the Video Clip, the Depthkit clip is ready for playback. The Play On Awake and Playback Speed settings are necessary for the Depthkit Capture tool.
Finally, you can optionally configure the Depthkit Studio Mesh Source component’s Surface Buffer Capacity field to control the polygon count of the output mesh. The default setting, 300,000, can produce dense meshes with large file sizes when used with the Depthkit Capture Tool. Arcturus recommends a value between 40,000-60,000 for lighter files and faster processing.
DepthkitCapture Configuration
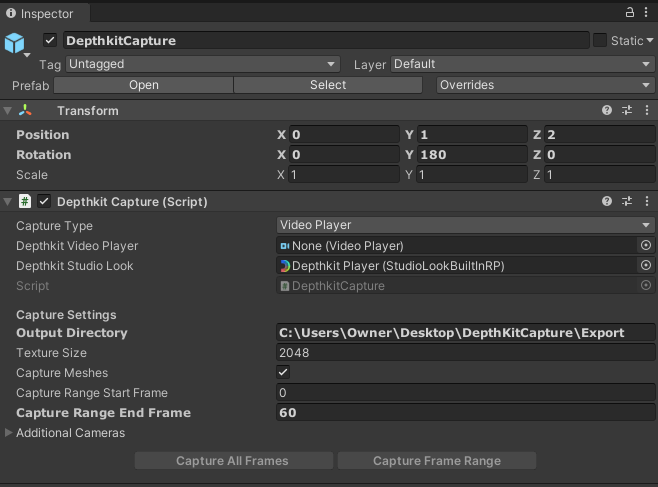
The Depthkit Player is ready for playback. Next, we need to configure the DepthkitCapture object so that we can output the depthkit files to disk for further editing in HoloEdit. The DepthkitCapture object has a single component: the Depthkit Capture script.
Ensure that the Capture Type dropdown is set to Video Player
On the Depthkit Capture script, configure the following settings:
Depthkit Video Player & Depthkit Studio Look: These two fields must be supplied with the corresponding components from your Depthkit Player. Ensure that they are both configured to reference the DepthKit Player prefab.
Output Directory: Update this field with a valid path on your hard drive. This is where the output frames will be saved during capture.
Capture Range Start Frame: Set this to the first frame of Depthkit playback that you’d like to capture.
Capture Range End Frame: Set this to the last frame of Depthkit playback that you’d like to capture.
Texture Size: Set this at your desired output texture resolution. We recommend the default value of 2048.
Refer to Capturing for the next steps in exporting your mesh and MVE.
Image Capture
For the Image Capture workflow, your image sequence files must be located inside of the StreamingAssets directory. You may create a new folder inside of the StreamingAssets directory and then copy your image sequence clip into that directory.
Depthkit Player Configuration
To configure the Depthkit player for capture, you’ll need to make changes to the Depthkit Clip and Playable Director components on the instance in your scene.
First, configure the Depthkit Clip component. The following settings should be adjusted:
Video Player Ensure this option is set to Streaming Image Sequence Player
Metadata: Set the Metadata field to point to the metadata .txt file included with your Depthkit data.
Poster: To enable an editor mode preview of your clip, update the Poster field to point to the poster file included with your Depthkit data.
Before configuring the Playable Director, you’ll need to prepare a Timeline Animation for your image sequence.
Timeline Creation
In order to drive image sequence playback, you’ll need to create a unity Timeline. Verify the Depthkit Player object is selected, and then open the Timeline window from Window -> Sequencing -> Timeline. In the Timeline window, press the Create button to make a new timeline. This timeline will be used to drive playback for a single clip. Save this timeline to your assets folder and name it accordingly.
In your Timeline, delete the default Depthkit Player (Animator) track. Next, create a new Streaming Image Sequence Track by right clicking on the timeline and selecting Unity.StreamingImageSequence>Streaming Image Sequence Track. Click on the target icon for that track, and select the DepthKit Player object to direct the timeline to its StreamingImageSequence component.
After creating the track, it’s time to add the depthkit image sequence. To add a clip containing your image sequence to this timeline, right click on the Streaming Image Sequence track and select Add from Default Asset. Select the folder containing your Depthkit image sequence.

Finally, configure the clip playback parameters. Left click on the clip you just created to display its parameters in the inspector. Update the Duration ‘f’ field to the total number of frames in the depthkit data.

Depthkit Player Configuration: Playable Director
After preparing the timeline, return to the Depthkit player object to configure the Playable Director component. Update the following settings:
Playable: Set the Playable component to the timeline you created in the previous step.
Play On Awake: Disable.
Update Method: Manual.
Note
As soon as you configure the the Playable Director, the Depthkit clip is ready for playback. The Play On Awake and Playback Speed settings are necessary for the Depthkit Capture tool.
Additionally, you can optionally configure the Depthkit Studio Mesh Source component’s Surface Buffer Capacity field to control the polygon count of the output mesh. The default setting, 300,000, can produce dense meshes with large file sizes when used with the Depthkit Capture Tool. Arcturus recommends a value between 40,000-60,000 for lighter files and faster processing.
DepthkitCapture Configuration
The Depthkit Player is ready for playback. Next, we need to configure the DepthkitCapture object so that we can output the depthkit files to disk for further editing in HoloEdit. The DepthkitCapture object has a single component: the Depthkit Capture script. In the ImageCapture scene, the Capture Type dropdown is already set to Streaming Image Sequence Player
On the Depthkit Capture script, configure the following settings:
Playable Director & Depthkit Studio Look: These two fields must be supplied with the corresponding components from your Depthkit Player. Ensure that they are both configured to reference DepthKit Player.
Output Directory: Update this field with a valid path on your hard drive. This is where the output frames will be saved during capture.
Capture Range Start Frame: Set this to the first frame of Depthkit playback that you’d like to capture.
Capture Range End Frame: Set this to the last frame of Depthkit playback that you’d like to capture.
Texture Size: Set this at your desired output texture resolution. We recommend the default value of 2048.
Capturing
After following the instructions for either workflow, everything is configured to capture your Depthkit data for HoloEdit.
Important
Make sure to save your scene frequently. We recommend saving immediately before capture.
To begin capture, press the Unity Play button to start the scene. This will start the capture process. Progress is displayed in the Unity Console.
When capture is complete, your mesh and texture files will be located in the specified Output Directory. The resulting Raw and Texture files are ready for clip import in HoloEdit.
Compiling Textures in HoloEdit
Once you’ve completed the capture process, you can copy your Raw and Textures folders into HoloEdit, and create clips from them using names of your choice. Add those clips to a track with Load Asset stages, then use the Clean Mesh and Texture Reconstruction stages to generate a clean mesh with textures.
Note
With data captured from the Depthkit Capture tool you should always run the Debride and Remove All But Largest Component steps in the Clean Mesh stage unless they visibly reduce mesh quality. These two operations help ensure a high quality Texture Transfer result.