The Composition Panel
The Composition Panel contains the Timeline, Track Editor, Playback Controls, and the Service Selector. In the Default Layout, this panel appears at the bottom of the HoloEdit UI, below the Viewport and next to the Project Panel.
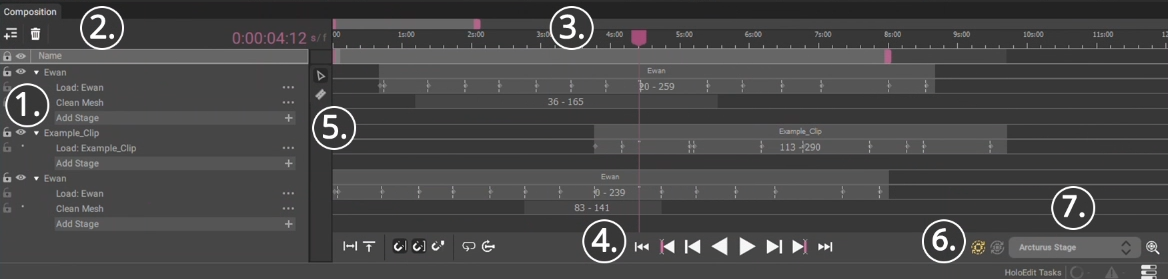
The Composition Panel allows the user to interactively view and edit the composition in the Timeline, and create stages and intervals for processing.
The Composition Panel is made up of the following pieces:
The Track View panel to the left of the timeline showing your track and stage names
The Composition Toolbar is the thin strip directly above the Track View
The Timeline contains track, stage and interval data
The Timeline and Playback Controls can be found along the bottom of the Timeline
The Timeline Toolbar is between the Track View and the Timeline
The Process Pending and Selected Buttons These buttons will execute intervals that are dirtied or unprocessed, or selected, respectively.
The Service Selector This drop-down list will display available HPS servers to choose from. See Choosing a Job Server for more information. This also includes the Job Viewer short-cut.
The Track View
Track Controls

The Track Controls are located in the top left of the Composition Panel, on the same row as the time display.
Add Track: Represented with a “Rows +” icon, the Add Track button creates a new empty track at the bottom of the composition
Delete: Represented with a “Trash Can” icon, the Delete button deletes the currently selected tracks, stages, or intervals
The Timeline Toolbars
The Timeline Toolbar, located in the vertical strip in between the track view and the timeline, contains tools for editing intervals in the Timeline. The Timeline contains two tools.
The Arrow Tool

The arrow tool is selected automatically after opening HoloEdit. This is the main tool for selecting and editing intervals in HoloEdit, and lets you perform all normal editing tasks such as creating and modifying intervals.
The Razor Tool
The Razor Tool is a special tool for editing intervals in the Timeline. Using the Razor tool, you can cut existing intervals into two new intervals with left-click. Additionally, you can perform this function across an entire track by holding shift and left-clicking.
Intervals created through the Razor Tool will inherit the settings of the original interval that was cut.
Stages
Processing and editing work in HoloEdit is done through Stages.
Stages are individual processes that add or manipulate the data streams contained in a track. Each stage represents a kind of process, and can contain one or more intervals specifying frame ranges and custom settings for processing. Each stage corresponds to a row on the Timeline where intervals can be created for that stage.
Stages can be clicked on and selected to display their details and settings in the Inspector window.
The specific settings available and their effects depend on the stage. See Stage Types for more details.
For more information on editing settings in the Inspector, see Inspector - Settings.
You can use the Interval Settings to configure the options provided by the stage independently per interval.
When one or more tracks are visible, a small dot appears to the left of stages with samples currently being displayed in the viewport.
Stage Controls
The Stage Controls for each stage can be accessed by clicking on the three dots to the right of a stage name, or by right clicking on the stage name.
Propagate Intervals To Next Stage: Create new intervals on the subsequent stage matching each interval present in the stage. Does nothing if no stage exists below the specified Stage. Existing intervals will be overwritten if they overlap with the new intervals.
Rename: Makes the name field editable so the user can provide a custom name. To apply a name change, press enter or click away from the text field. You can also rename stages by selecting the stage and pressing the “F2” hotkey.
Copy Settings: Copies all edited settings on the current stage.
Paste Settings: Pastes the last copied stage settings to this stage.
Clear Stage Intervals: Removes every interval from the stage. As with interval removal elsewhere in HoloEdit, any data streams in the stage will be preserved.
Clear Stage Data: Removes all data streams from the stage. Intervals are left intact.
Delete: Delete the stage and its contents.
Creating And Arranging Stages
To create a stage for any interval, press the “Add Stage” button at the bottom of that track’s stage list, then choose a stage type from the drop down menu.
Stages can be re-arranged by clicking and dragging on the stage name, and releasing the stage at any point within its parent track. Rearranging stages that have been processed can cause intervals to be labeled as dirty (see Editing Compositions - Intervals for more information).
Stage Selections
Multiple Stages can be selected at once by shift or ctrl clicking on multiple stages. Each selected stage will be highlighted in the Track View UI.
When multiple stages are selected, the most recently selected two stages will be available for Comparison View, and the most recently selected Texture or Animation Stream and all selected Mesh Streams will be displayed in the Inspector. Additionally, the “Delete” button (Trash Can Icon) at the top of the Track View will delete all selected stages and intervals currently selected.
Visibility


The “Eye” icon to the left of a track or stage can be clicked to show or hide that track/stage.
During export, only visible tracks will contribute to the export.
Lock


The Padlock Icons to the left of the eye icons can be clicked to toggle Locking a stage or track. When an item in the composition is locked, its intervals will be greyed out in the Track Editor, and cannot be accidentally resized, moved, or deleted. Additionally, most of the Stage Controls are unavailable via right-click or via the three dots icon to the right of the stage name. Locked stages and intervals will be placed in read-only mode.
Locking may be applied at either the track or stage level. When a track is locked, all of the stages contained within are also locked, signified by greyed-out closed padlock icons. Unlocking the track will also unlock the corresponding stages if they inherited their lock status from the track. Stages that were locked individually will be signified with the lit up closed padlock icon and will remain locked regardless of the track state.
The Composition Toolbar
The Composition Toolbar is the thin strip above the Track Editor, directly to the left of the Time Ruler. The Composition Toolbar contains tools for editing the composition:
Current Time display
The Current Time Display shows a numerical representation of the current time represented by the Playhead. Clicking on the “s / f “ text to the right of the time toggles the display between frame and timecode formats. Left-clicking on the current time allows you type in a specific value to update the playhead.
The Timeline
The Timeline is made up of three parts
The Time Ruler, the topmost strip displaying the timing of your composition for navigation

The Interval Editor, the large area directly below the Time Ruler
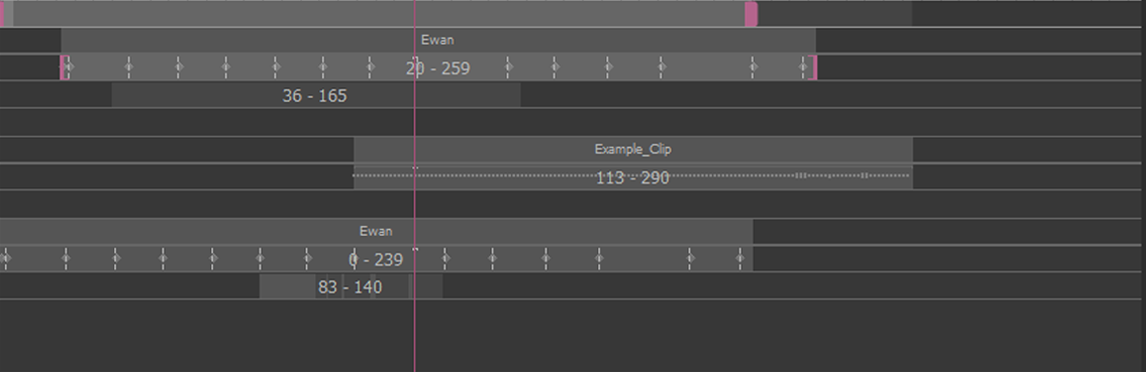
The Timeline Controls, a bar stretching along the bottom of the Timeline

The Interval Editor is the primary workspace for assembling and editing tracks. Each entry in the Interval Editor is aligned to a stage in the Track View, to the left. The Interval Editor is where you create, arrange, and inspect intervals.
The Playhead
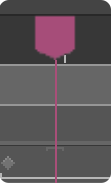
The Playhead is the pink line and arrow block positioned on the Timeline. This represents the current Timeline in HoloEdit.
Navigation
You can zoom in and out on the Time Ruler and Interval Editor with the mouse wheel, or by clicking and dragging on the pink “Timeline Zoom” bar at the very top of the Timeline. You can pan the Timeline by clicking and dragging the middle mouse button anywhere in the Timeline view. Additionally, you can frame the composition by selecting the Frame Timeline option in the View menu, or pressing the “G” Hotkey. This will zoom and pan the Timeline to frame the entire composition if no selection is present, or a portion based on the stage and interval selection.
Track Time Selections
Within the portion of the track corresponding to a stage, You can left-click and drag on empty track space in the Interval Editor to create a “Track Time Selection”, indicated by a block of time highlighted in dark blue. To select multiple intervals, You can click and drag over existing intervals, or shift left click on intervals.
Right-clicking in the Interval Editor will bring up a context sensitive menu.
Right-clicking into the Timeline, the options are:
Execute all Intervals In Stage: All intervals in the stage will be executed for processing. See Processing & Jobs for more details
Execute All Intervals Missing Outputs: Every interval containing incomplete work (frames not executed, frames with errors, etc.) will be executed as a single job. See Processing & Jobs for more details
Propagate interval Create new intervals on the subsequent stage matching each interval present in the stage. Greyed out if no stage exists below the specified stage. Existing intervals will be overwritten if they overlap with the new intervals
Right-clicking on a “Track Time Selection”, the options are:
Add Interval(s): Create interval(s) in selected time & stage(s)
Clear data: This removes data present in the selection, but not currently contained in an interval (as a product of processing an interval and then resizing or deleting it)
Right-clicking on an Interval the options are:
Execute: Executes incomplete data in the selected intervals for processing. HoloEdit will create a job that processes the necessary work to correct failed, dirty, or unprocessed frames and segments. See Processing & Jobs for more details
Execute Missing: Execute any selected interval containing incomplete (failed or not yet processed) frames. See Processing & Jobs for more details
Execute Dirtied: Execute dirtied frames in any selected intervals. See Interval Dirtiness for more details on Interval Dirtiness
Execute Failed: Execute failed data in any selected intervals. HoloEdit will create a job that processes the necessary work to correct failed frames or segments.
Export: Export only the contents of the selected interval(s). See Export for more details
Delete: Remove the selected Intervals from the track
Clear Data: Remove generated data and configuration for the selected intervals
The Execute Missing, Execute Dirtied, and Execute Failed options are context sensitive, and may not appear in the right-click menu if appropriate samples are not present in your selected interval(s).
Snapping
When adjusting an interval, by default the ends will automatically snap to the ends of other intervals on the Timeline, even on other stages. The items being snapped to are highlighted in white. This can be disabled via the “Snap Interval” button in the Timeline Controls. See Timeline and Playback Controls for more information.
Loop Selection

Playback is constrained by the Loop Selection, the grey bar with pink handles located directly below the Time Ruler and above the Interval Editor. This can be resized by clicking and dragging the pink handles on either side, and moved by clicking and dragging on the body of the selection. Playback will stop and start within these boundaries.
Timeline and Playback Controls
The Playback Controls bar contains controls for playback and some Timeline settings.
From left-to-right, the controls are:
Playback Controls
Start: Set the Playhead to the first frame in the composition
Previous Interval: Set the Playhead to the closest preceding interval start
Previous Frame: Step back one frame
Play Backwards: Play the current composition in reverse
Play Forwards: Play the current composition
Next Frame: Step forward one frame
Next Interval: Set the Playhead to the next closest interval start
End: Set the Playhead to the last frame in the composition
Snap Settings
Snap To Frame: Always enabled
Snap Interval: Toggles interval snapping when scaling or moving intervals
Snap To Playhead: Disabled in 2023.1
Loop Controls
Loop: Toggles looping when playing within the current Loop Range
Reset Loop Markers: Resets the Loop selection to run from the first frame in the composition to the end of the composition
Additionally, you can scrub through the current animation by clicking and dragging the Playhead on the Time Ruler.
Playback is constrained by the Loop Selection, the grey bar with pink handles located directly below the Time Ruler and above the Interval Editor. This can be resized by clicking and dragging the pink handles on either side, and moved by clicking and dragging on the body of the selection. Playback will stop and start within these boundaries.
Process Pending/Selected Buttons

The Process Pending (yellow), and the Process Selected (white) buttons allow you to execute intervals more efficiently by grouping similar intervals together for job submission, or by submitting only those intervals you have selected.
Process Pending
This button will send off all unprocessed, or dirtied intervals to the currently selected HPS.
Process Selected
This button will send all selected intervals off to the currently selected HPS for processing.
Service Selector
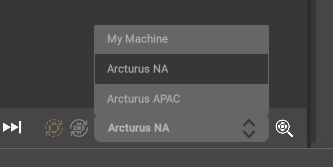
The Service Selector can be found at the bottom right-hand corner of the Composition Panel. It allows you to quickly view, and choose which HPS server you would like to send jobs to. This menu acts much like the Jobs > Active Job Server menu found at the top of HoloEdit.
When selecting ‘My Machine’ from the Service Selector for the first time, it will run the first-time set-up for local job server. Future selections of ‘My Machine’ will not run this first-time set-up.
HoloEdit stores which jobs are processing on what servers in the composition. This means you do not need to remember and change the HPS service manually, and what you were using will be applied when you load the composition.

To the right of the Service Selector is a short-cut to the Job Viewer.